Why the Present High Costs of Bookbinding? Bindery Wages in 1920

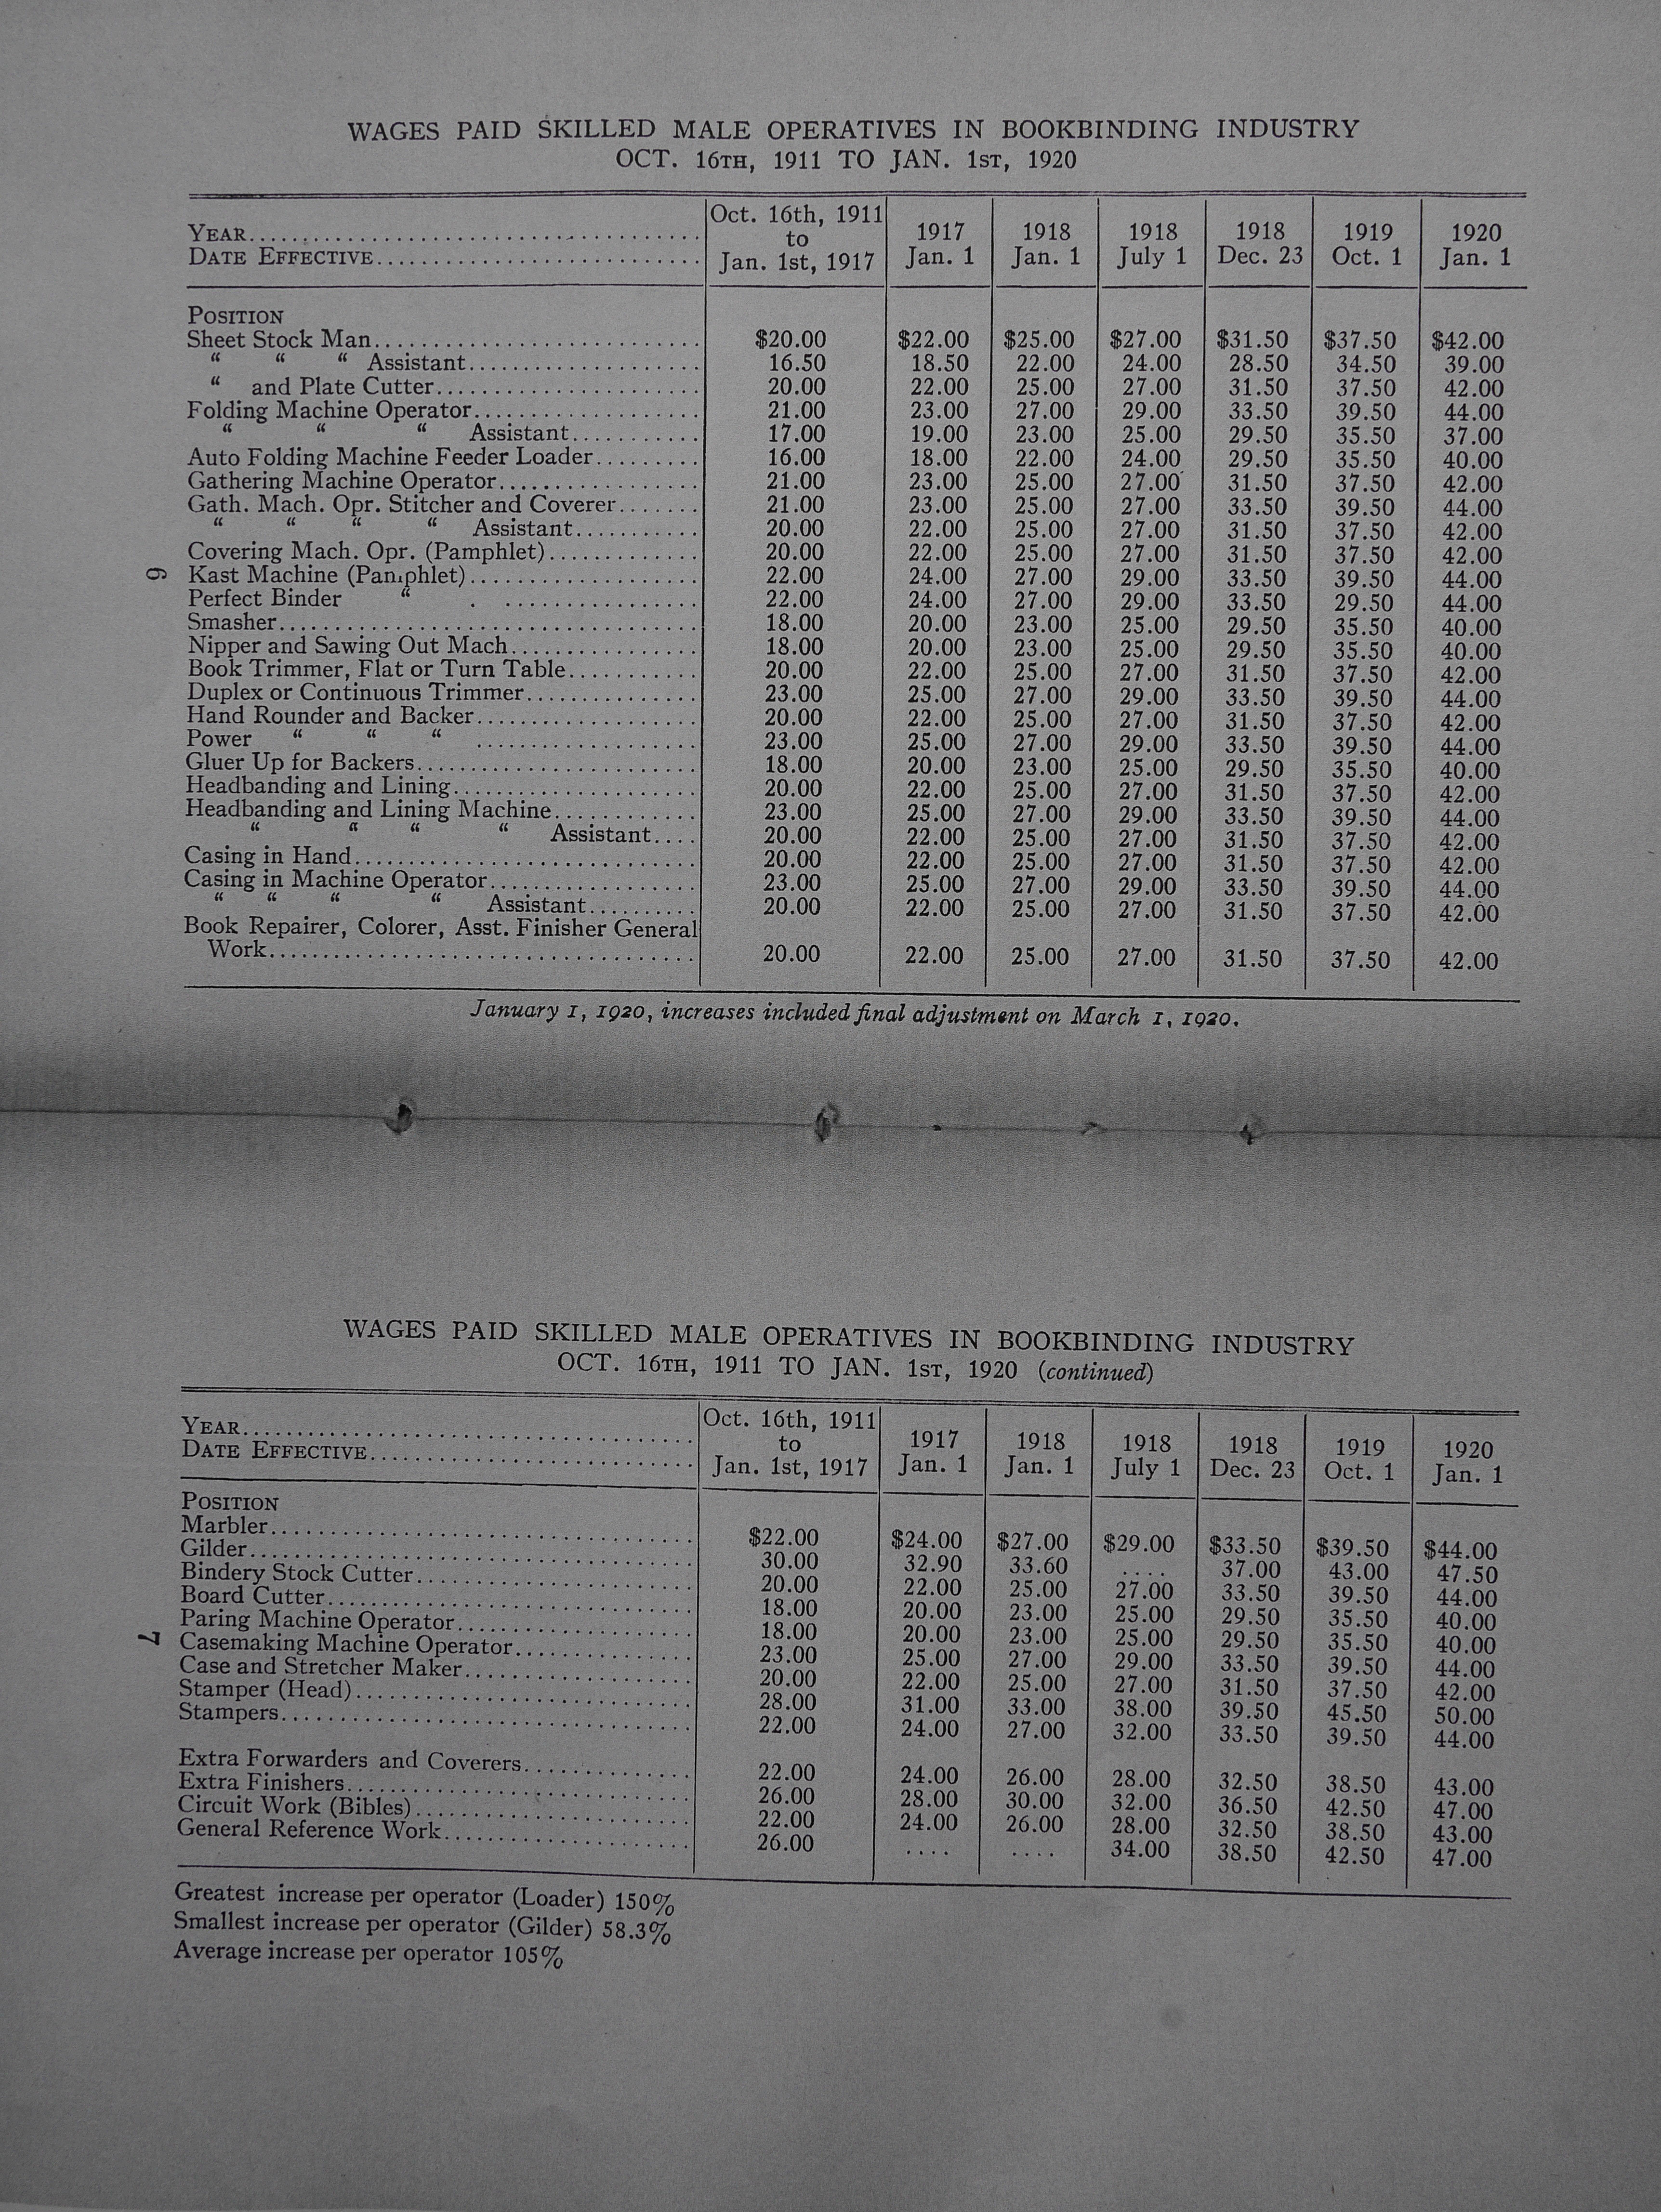
It is often claimed that the most skilled, and highest paid position in a bookbindery was the finisher. However, in 1920, the J.F. Tapley Co. paid the head stamper $50 a week, while an extra finisher earned a bit less, $47. Even the casing-in machine operator earned $2 more than the hand casing-in position, at $44 a week. Wages varied between $37 and $50 for skilled male work. At least for this company, machine operation was apparently valued more highly than hand work, likely because it was more profitable.  All the workers are referred to as “operatives”, whether engaged in machine or hand work.

The argumentative title of this company produced pamphlet, “Why the present high costs of bookbinding?” indicates some defensiveness and weariness when asked this question. I can totally relate. And since I work alone I can’t blame it on rising employee wages. The pamphlet cites increases in other costs, such as materials, as additional factors. The rise in wages between 1917 and 1920 is startling, but apparently there were no increases between 1911 – 1917.

Why the present high costs in bookbinding? J.F. Tapley Co.: New York, 1920. Bernard C. Middleton Collection of Books on Bookbinding, Cary Collection, Rochester Institute of Technology.

Below is the breakdown for the women operatives. Women’s positions in trade binderies were very stable at least since the eighteenth century. This is a surprising to me, given how much books changed during this time. They primarily did the folding, gathering, sewing, and laying-on of gold. The highest paid woman’s position was the head gold layer, at $27.50.

Women also operated the machine that replaced their traditional hand work. I can’t quite understand why the work itself was more gendered than operating a machine. Usually men operated the machines in factories at this time.

Why the present high costs in bookbinding? J.F. Tapley Co.: New York, 1920. Bernard C. Middleton Collection of Books on Bookbinding, Cary Collection, Rochester Institute of Technology.

Of course there were many women hand bookbinders making fantastic books around this time. One of my favorites is Sybil Pye, and her hallucinatory take on traditional book design still looks fresh today. She was an aunt of David Pye, the wood carver, turner, and craft philosopher. David Pye’s “Nature and Art of Workmanship” is a common entry text for bookbinding students interested in exploring larger questions of Craft. The circle grows smaller.

Using a Cigar Press for Bookbinding

Cigar presses are usually smaller than book presses, and often just half-arch, rather than full-arch.  As such, they cannot generate as much pressure as a real book press. The one I purchased seems to have the compressional force of a typical copy press, which is adequate for the most common bookbinding tasks: firm adhesion of pastedowns, casing-in, and tray attachment when boxmaking. It wouldn’t be too difficult to modify a large C – clamp to make something similar.

Since they are lightweight, this one is about 30 lbs, they are great for teaching and travel.  They usually have much more daylight than copy presses, again, useful when teaching, or for a secondary press. The main disadvantage is they only can be used for small format books.

Since cigar presses were originally used for pressing hand rolled cigars in long wooden molds, they often don’t have a top platen.  I made a 7 x 9.5 inch aluminum one for this machine.  Will I end up in conservation purgatory for drilling two holes in a historic machine?

Unmarked half-arch cigar press. I mounted a 7 x 9.5 inch aluminum platen on it.

Japanese Burnishers, Part Two

Part One of my investigation into Japanese Burnishers concluded by mentioning the next step would be to make a larger version with a Delrin sole.

After testing this new iteration for a couple of weeks, I find the larger size much more useful for the way I work, perfect for high pressure/ low friction applications. Paper conservators may find the smaller, more precise tool desirable. Both sizes have a plum wood handle which is attractive and has a silky smooth feel. They are easy to make in five steps.

The sequence of making a Japanese style burnisher.

The basic premise is simple: all you have to do is remove everything that is not the final shape of your burnisher.

  1. Rough out the wood with a bandsaw, a turning saw, or coping saw using the template below, or one of your own choosing. Fruitwood is ideal for this, at least 5/4 thick.
  2. Refine the basic shape using a carving axe.
  3. Smooth the axe work with a spokeshave and define the inner curve with a half-round rasp.
  4. Sand everything smooth and add a Delrin (or material of your choice) sole. Screw into place.  Tips on shaping Delrin.
  5. Finally, apply a coat of your favorite wood finish. I like Watco Danish oil finish for this purpose, which in this case darkens the plum wood beautifully.
The template shape I like to begin with. Make it comfortable for your own hand!

I keep finding more uses for this tool, most recently while laminating museum board to make wooden board thickness boards for a rebinding. It is also great for smoothing linings on the inner trays of drop spine boxes, or other operations where a lot of pressure is necessary. The heel of the sold is rounded in order to apply extreme pressure. The raised handle makes it easy to pick up, and it looks quite attractive sitting on my work surface. Even a client has commented on it.