“In European bookbinding the sewing frame or sewing press is an essential piece of equipment. The primary sewing–that which connects the quires of sections of a text-block– is the very foundation of binding, and I believe a well-consolidated, multi-quire text-block sewn onto bands can only be achieved by using a sewing frame.” Christopher Clarkson, ‘Thoughts on Sewing Frame Design for the Book Conservator’ in The Paper Conservator 19, 1995. (p. 41)
The earliest known representation of a sewing frame is found in the well known Bamberg Miniature, from around 1250. During the past 750 years there have been few changes to its basic structure. Essentially, a sewing frame consists of a base, two uprights and a crossbar which can hold the sewing supports at 90 degrees to the signatures while sewing. This allows the supports to be properly tensioned and keeps the entire text-block in precise alignment. I find it is faster to sew a book on a frame and the sewing is more accurate for all types of supports– even if you are pre-piercing and using tapes. Additionally, there is an ineffable satisfaction in using a piece craft equipment with such a long history, it makes bookbinding easier and more enjoyable. Many shortcuts in current bookbinding technique– one of them not sewing on a frame– tend to produce a book that can look and feel homemade, rather than handmade.
Despite the essential stability of the sewing frame as standard bookbinding equipment, there have been minor changes: the shift from the base being a table to portable, the Northern European addition of adjustable hooks, gated fronts, and cantilevered uprights, the (French?) addition of a ‘tenter’, changes in the size and shape of the sewing keys, the use of manufactured woods and other materials for dimensional stability, etc…. A candle holder, pictured in C. E Prediger’s Der Buchbinder und Futteralmacher, 1745, (reproduced in Mirjam Foot’s Bookbinders at Work) has to rank as one of the more creative improvements. It is only recently that sewing frames have changed significantly.
During the past 60 years or so, sewing frames seem to have the allure of a better mousetrap, with inventive bookbinders and conservators rethinking some traditional formulations. Sidney Cockerell used the idea of cantilevered uprights, but improved the rigidity of them by making them solid. Chris Clarkson refers to this as the ‘Mark I’ style sewing frame. I believe John Corderoy, in the 1967 Bookbinding for Beginners was the first to mention a folding sewing frame on page 21. Later Roger Powell created a unique key slot that permitted the supports to be strung at the front of the base, making starting the sewing much easier, and was possibly the inventor of cushioned sewing boards. Chris Clarkson and Peter Clothier in 1992 contributed several more improvements with their Mark III sewing frame. Laurenson-Stuart also made a non-adjustable cantilevered frame modeled in the Cockerell design, which was sold by Hewit & Sons in the 1990’s. Phillip Smith created a single post frame,and a clamp-on version. Most recently, Tim Ely has invented the Dreadnaught and Scout, a modern rethinking of the cantilevered design, made with modern materials, outfitted with a rear view mirror and ‘anubis’ clips to hold supports. Some who have caught the sewing frame bug– such as Tim Moore, Keith Uram, Robert Walp, and Frank Weisner— are not tempted to improve on the traditional design, but are making well crafted, high quality hardwood frames with a modern aesthetic.
Yet the siren song of the sewing frame inspires some truly bizarre ideas– for example, here is a sewing frame made from an old book— conceptually clever, yet I can’t imagine it is actually rigid enough to function, but the author claims it also works as a piercing jig. For some reason, there is also an odd tradition of using the legs of a chair, in this image the chair is placed flat on a table, and the book attached between the legs, from the front to the back, under the seat. Halliday’s 1930 Bookbinding as a Handwork Subject contains two additional variants of this unfortunate approach; using the chair upside and using the bottom of the seat as the base, and using the chair upright and attaching the supports to the back of the chair.

Ruth Zechlin, Werkbuch für Mädchen und für alle die Freude am Werken haben, 1961 (first edition 1932)
The tradition seems to be not just confined to America and the United Kingdom, Peter Zillig sent me the above German example, I presume from the 1932 edition, but am not sure. It looks like the opposite side of the chair is also strung up, perhaps for a ‘dos-a-dos’ binding? I’m surprised no one has claimed chair/sewing frame as a combination book press/ sewing frame– after sewing, one could simply sit on the book to press it. Of course, a simple frame is relatively easy to construct, if you have a few hand tools– drill, saw, router, sandpaper– and some basic woodworking skills, like this one I made with metal rod uprights.
Many book arts suppliers also offer inexpensive traditional looking wooden versions, though they should be carefully inspected for quality– at least make sure the center of the crossbar coincides with center of the slot on the base and the screws turn smoothly. Older frames, due to poor storage, are sometimes too loose and warped, which can interfere with accurate sewing. Also, when evaluating a frame, make sure the uprights are at 90 degrees to the base and crossbar is rigid. If it deflects, each time you tension a support, it will change the tension on the others. A few broken or chipped wood threads are common and will not interfere with the action of the nut. If a wood nut is very tight, the threads need to be filed or sanded slightly larger.
***
I began to make and think seriously about sewing frames in 1997, during a week long Mellon Advanced Conservation Workshop held at the University of Iowa, co-taught by Joel Spector and Tom Conroy. I made two wood frames– a full size German style cantilevered press, and a smaller, traditional English style. I’ve also made a dozen of the portable frames, similar to the one pictured above, for a class I taught at PBI. My interest in frames was rekindled when I saw a Hickock Blank Book sewing frame, with its easy to use T-slot adjustment mechanism for attaching sewing supports.
A major, inherent problem with all previous sewing frames is that they are awkward to store when not in use; often they are placed on a high shelf, difficult to access and exposed to excessive heat and dust, or have to be disassembled, which is also a pain. I suspect these inconveniences sometimes keep them from being used. I often found sewing keys difficult. I borrowed the t-slot idea from Hickock, supports that attach to the front of the base from Powell, added advantage of folding uprights solidly constructed out of aluminum, and The Nokey Sewing Frame was born.
***
THE NOKEY SEWING FRAME

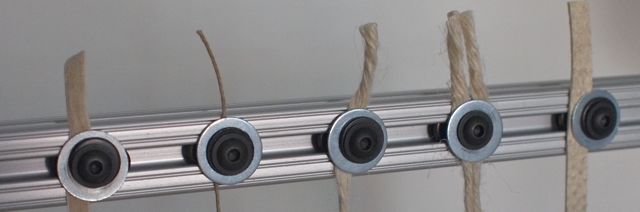
Fig. I: The Nokey Sewing frame strung up with a tape, thin cord, thick cord, double cord and slit thong.

Fig. II: The Nokey folded.

Fig. III: Hex head adjustment driver.

Fig. IV: Close up of buttons with various supports.
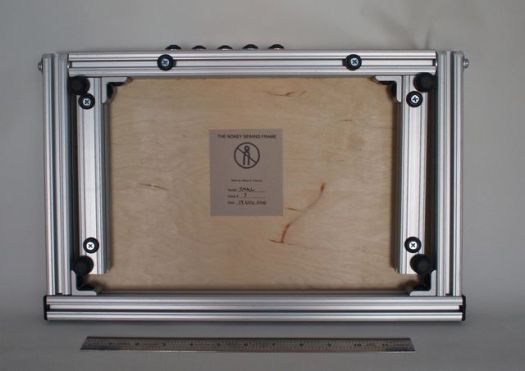
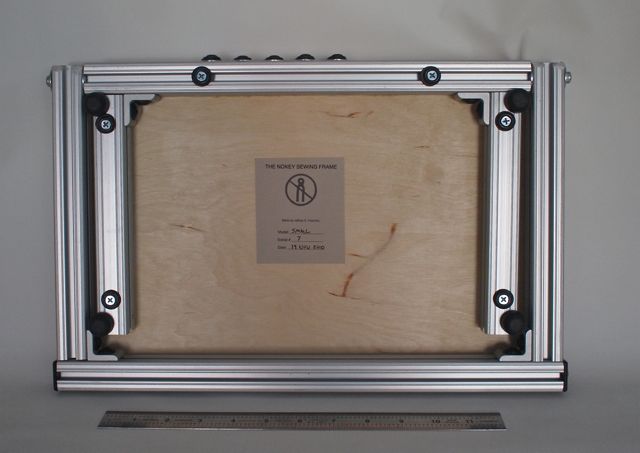
Fig. V: Bottom of Nokey, folded, with 12 inch ruler.

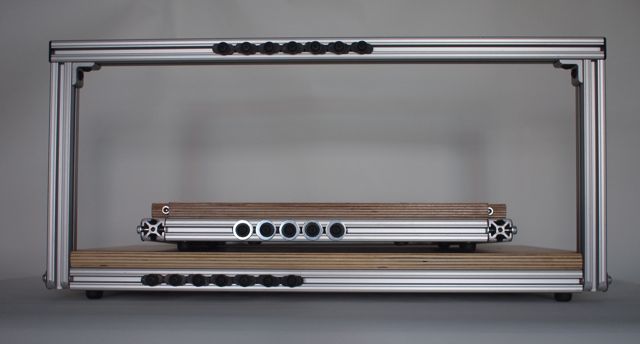
Fig. VI: Large Nokey open, small Nokey closed on top.
***
ADVANTAGES OF THE NOKEY SEWING FRAME
1. Nokey means easy to set up and quick adjustment of spacing for all types of sewing supports- tapes, single and double cords, thongs, etc….
2. Folds flat for convenient dust free storage and transportation, only 2.25″ thick.
3. Solidly constructed of aluminum and plywood. Zero deflection, this is the strongest sewing frame ever made.
4. Uprights stop at exactly 90 degrees, and can be adjusted.
5. Sewing starts at the edge of the sewing board, making it easy to begin sewing and sew in the round.
6. Rubber feet keep even small size frame from sliding around on the bench.
7. Minimum distance between supports: 1 inch.
8. Buttons which attach supports tighten and loosen with a 5/32″ simple hex head driver, which is included.
9. Partially sewn books can be quickly removed and replaced, which make the Nokey ideal for schools.
10. Custom sizes and additional buttons available, please inquire.
“Nearly 40 years ago I made my first sewing frame out of scrap wood. It rocked back and forth like an old table but it taught me the value of the sewing frame as a tool and I’ve never been without one since. I now have three in my shop. The Nokey Sewing Frame is a real innovation, taking the best of a traditional design and adapting it to new materials and needs. It is actually fun to use. The button screws make for very fast and easy setup.And it’s versatile enough to accommodate nearly all the variations on supported sewing I can think of for general bookbinding as well as conservation work. Well designed and well made with high quality materials, this is quite simply a great tool.”
-John Townsend, (aka Anonymous Bookbinder)
*
UPDATED 21 NOVEMBER 2015: I’ve changed the design slightly, see the “Tool Catalog” section of this blog for prices and how to order.