Conservation Technician, Columbia University Libraries.
[ NOTE: I worked with Andreas beginning in the early 1990s at Columbia University’s Conservation Lab. Once they reopen, he will soon be completing 60 years of service! ]
2. My four knives which I use in different situations, they differ in size and sharpness. Two are like the one above. What is good is about them is they have a certain amount of flex which I need when I’m peeling binders board from the back of the end sheet. In order to save original end sheets (often maps or other decorative designs), I have to go from the back of the end sheet. This involves peeling different types of binders boards, with different densities. and made of different materials. A sharp knife is needed to peel away the back of the end sheet.
I made this replica of Andreas’s rigid dull knife from memory. I think the shape was caused by 50+ years of work and resharpening, given the thickness of the spine of the blade.
The other two are smaller and have a more rigid back of the blade (see below). They are good for cleaning the book spines. When I clean the back of the books, a dull knife like these is good because it is a scraping action and not a cutting one.
3. Scissors, a standard bookbinder’s model with one blunt end.
4. Micro-spatula, a Caselli, of course.
5. Sanding block, which is helpful when tip-ins are done. The sandpaper block is used on any bits of paper that sticks out.
I could list others, but those are ones that I use most.
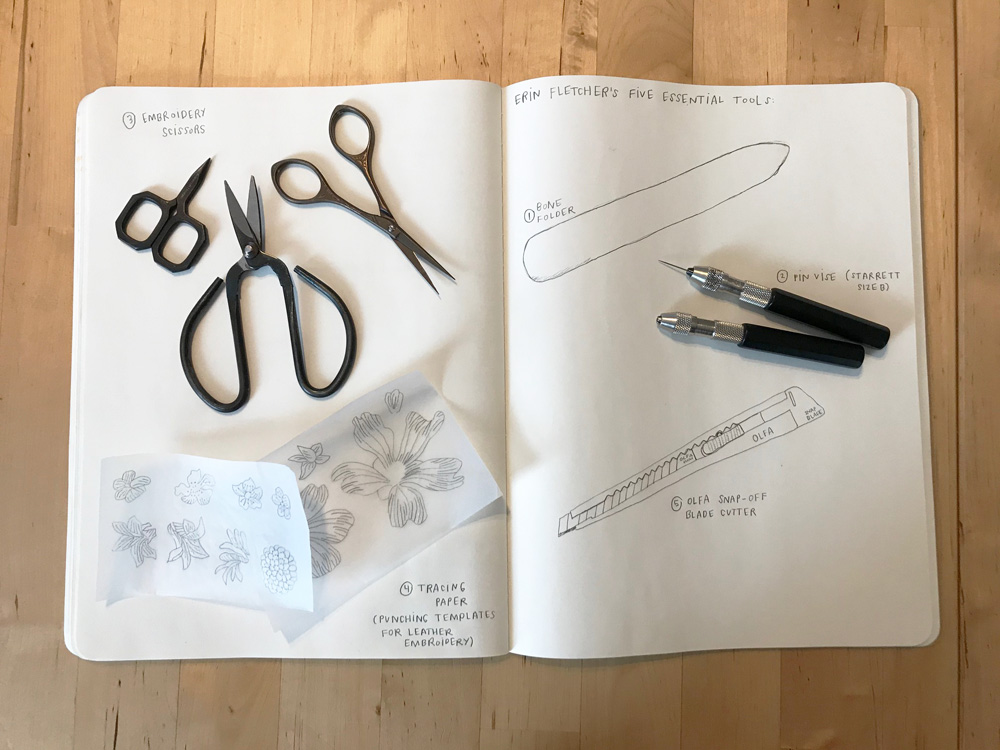
1. My oldest tool: a classic bone folder
I reach for this tool every day in the studio to assist in many aspects of my work. I’ve definitely developed an attachment to this specific bone folder and experience a mini panic attack if I can’t find it.
2. Pin Vise
I find my pin vise essential for both my bookbinding and embroidery work. As opposed to an awl, I appreciate the versatility of a pin vise. Switching out the size of the needle based on the work offers me more control. I talk up this tool every chance I get during workshops.
3. Embroidery Scissors
These small, slender scissors that cut to the point are great for snipping small stitches and getting me out of a bind when I make an error. Plus embroidery scissors come in a wide range of colors and designs, so they’re great for collecting.
4. Tracing Paper
After drafting the design for a binding, I reach for the tracing paper to use throughout the design and binding process. It’s perfect for determining the layers of a design. I also use tracing paper to place onlays and pre-punch for embroidery. And it comes in handy for tooling.
5. Olfa Snap-Off Blade Cutter
I think it’s important to use tools that feel comfortable in your hand. This particular style of Olfa knife is my absolute favorite. It’s slim and wide, but not too slim or too wide. I bought several replacements during a trip to Tokyo!
1. A decent laptop with an internet connection: Thinking about the tools I use every day, this one is at the top of the list, because there is so much work that goes into a successful conservation treatment before you even touch the object. There is the research: about the object, about the materials you will use, or about different treatment methods you could potentially employ (and maybe haven’t even done before). There is the communication: with your conservator colleagues, asking for their experiences working on similar objects, with curators to get more information about past and potential use by researchers or students, or sometimes even with the creator of the object. There is the documentation: the written condition report, the treatment proposal, and the lists of treatment procedures and materials you ended up using. In a pinch, you can even use the camera on the device to take photos before, during, and after your treatment.
Henry’s handmade elk bone folder.
2. A bone folder: If I could only have access to one folder, I would probably choose bone over Teflon for rigidity and quality of the edge. Out of the drawer of folders that I have, the one I gravitate toward most is a piece of elk bone which I shaped 10 or so years ago. It’s a little over 8″ long and mimics the shape of a butterknife. One end has a sharper edge that works well for scoring, while the other is wide and flat for compressing sections or consolidating a board corner.
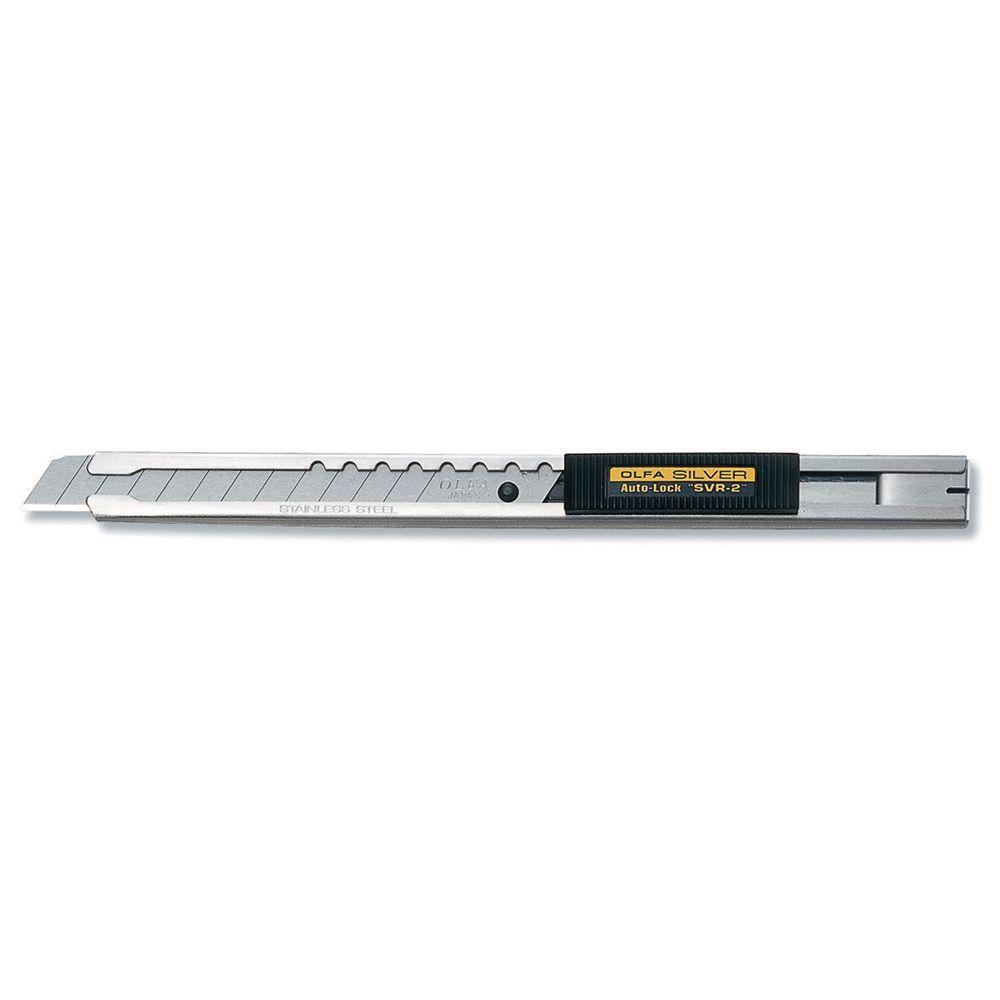
The olfa silver snap blade knife.
3. Olfa 9mm stainless steel slide-lock knife: I probably use this knife the most, because I end up making so many enclosures and the snap-off blades allow for a quick refresh. You can also fully extend the blade to cut through thick ethafoam planks for custom supports. There are so many little design details on this Olfa that I love. The removable endcap serves as both a pocket clip and blade snapping tool. The blade case even includes a small compartment to store old blade fragments. (I get to bring a pack of blades, too… right?)
Customized #2 Casselli microspatula.
4. Modified #2 Casselli microspatula: The 6 1/8″ Casselli micro-spatula is great for lifting. Two modifications have really improved the working properties of this tool for me: shaping the ends and making the center handle thicker. I’ve added a single bevel to the rounded end to make it more like a blade. The unmodified octagonal handle is fine for quick work, but really becomes tiresome on the pads of my index finger and thumb after lengthy use. I have wrapped the center of mine with Elastack (by Sutton Scientifics) to increase the circumference of the handle and make it more comfortable to hold.
Muji mechanical pencil.
5. Muji “Low Center Gravity” 0.5mm mechanical pencil: I often use a mechanical pencil to make small measurement marks on material that I am cutting or folding. Sometimes it is necessary to number loose pages to keep them in order during treatment, and a mechanical pencil with thin graphite is the best tool for the job. I’ve found this $9 mechanical pencil, with a weighted and knurled aluminum tip, is one of the most comfortable to use and great quality for the price.
There are a number of other tools which I very reluctantly pushed off the list, including: Staedtler Mars white vinyl erasers (because you always have to dry clean first, right?), spring dividers, a Starrett pin vise with insulated octagonal handle, and (of course) a straight edge of some kind would come in handy. I really like my 12″ rigid Starrett rule with both metric and imperial graduation, but I often find myself wishing it were longer.