Most of us think of marbling as paint or ink applied to a sized bath, usually manipulated somehow, then transferred onto a sheet of paper. This is essentially the definition put forward by Richard J. Wolfe, in his magnum opus, Marbled Paper: Its History, Techniques, and Patterns. His book is an invaluable resource, tracing the history of European marbling. The extensive plates dating particular patterns alone justify the price.
But what if we think of marbling not primarily as the transfer of colors, but the technique of using a stylus — or a number of them in a row, i.e. a rake — to manipulate strips or blobs of color into patterns? Visually, this is where most of the beauty and magic happens. And Egyptians were doing this as early as the 6th century BCE in glass.
Egyptian Alabastron and Flasks, 6th – 3rd century BCE. Corning Museum of Glass.
Recently I visited the Corning Museum of Glass, which has some very early glass containers that look marbled. The museum catalog describes the center container as having the, “entire surface decorated with alternating registers of fine trails [thin threads of colored glass] wound ten to twelve times before changing color; all threads have been marvered in and dragged alternately up and down sixteen times to form an elaborate and delicate festooned or feathered pattern….” ( 55.1.61)
Instead of colors applied to a viscous bath, glass trails are wound around a container. Then they are manipulated with a point or stylus. The alternating up and down stylus movement at regular intervals is quite similar to how many styles of marbling are done even today.
Does specialization in the decorative arts cause us to overlook a fundamental cross-disciplinary technique like this one? Or, is this a common decorative technique that it is continually independently rediscovered. If so, are there other examples?
One trait that unites book people (bibliographers, typographers, librarians, book conservators, graphic designers, collectors, book historians, printers, booksellers, curators, papermakers, bookbinders, etc…) is an emphasis on using an accurate terminology when describing aspects of the material book. The problem is that these sects have developed their own distinct usage, which sometimes overlap, and sometimes don’t. For example, the term “text block” means something entirely different to bookbinders and printers.
Most of us learn our terminology haphazardly. Considered historically, prescriptive attempts at linguistic change often fail, even if what they propose is more rational or accurate. Given improvements in text searching, and the ease of taking and disseminating digital images, I wonder if the need to use a strict terminology is as important as it once was.
Top Edge. B.F. Tefft, Webster and his Master-Pieces. Auburn and Buffalo: Miller, Orton & Mulligan, 1854. My Collection.
That said, I recently purchased a book that does not fit neatly into any existing descriptive framework that I’m familiar with. The distortions on the top edge of the book caught my attention when I looked at it in the store. Then I noticed the extremely crude backing, making it a useful “how-not-to” example when teaching. Many sections have two reverse folds! Then again, these reverse folds may have helped lock the sections into place, given the typical detaching of the spine linings: note the pages are not falling out at the foreedge. The binding itself is in good shape considering wear, even with an additional quarter inch or so of added material. The case binding structure is quite adaptable to different text block thicknesses.
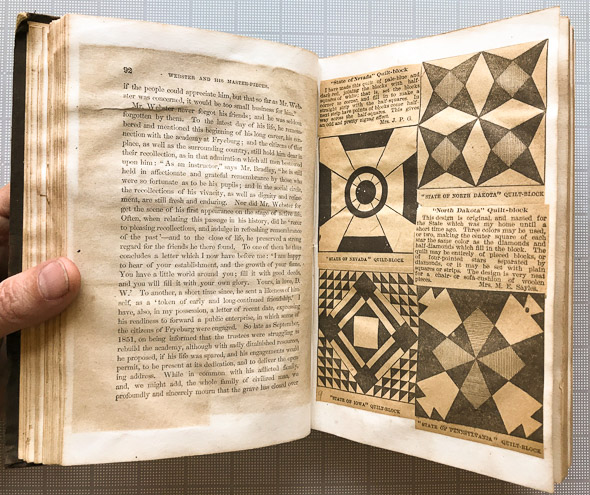
But the real reason I bought it was for the neatly glued in newspaper clippings of quilt patterns on the first twenty-four consecutive recto leaves. As in the example below, they typically completely cover the entire text block. The high quality of the text paper has helped buffer the newsprint, preserving it, though at the expense of the host: note the extensive staining on page 92, again quite typical.
Typical layout of four patterns per page. B.F. Tefft, Webster and his Master-Pieces. Auburn and Buffalo: Miller, Orton & Mulligan, 1854. My Collection.
It is not unusual for books to become repositories for all sorts of things: plants, leaves, receipts, scribbled notations, and the occasional hair-on mouse skin. I’m guessing the quilt patterns were added in the early 20th century. The additions cover and obscure the original text.
What to call it? Gary Frost, I think, would consider this in his broad rubric as an “intervention”. While it is certainly an altered book, I don’t think it has the artistic connotation that the phrase usually implies. It is not really a commonplace book, or an artist’s book. It is not extra-illustrated. It is more than a scrapbook, since the additions change the original book into something else.
Originally the book was about Daniel Webster, who created the first American dictionary, and a dictionary documents the recorded usage of words. This particular copy was altered in a way that obliterates the text in order to become a reference for quilting. Even through there is some text on the quilting patterns, images dominate. Likely unintentionally, this book is a physical manifestation of the conflict between text and craft, the book learning verses practical activities, the head and the hand. How are books used? More than reading, it seems.
*****
While rereading this post, and looking through the book again, I noticed at least 22 pages near the end with pressed plants. Most seem to be intentionally arranged, resembling marginalia. or in this case the title page of the Doves Bible. Hmmm.
One of over 22 pressed plants. B.F. Tefft, Webster and his Master-Pieces. Auburn and Buffalo: Miller, Orton & Mulligan, 1854. My Collection.
I’ll be teaching a hardcover pamphlet binding workshop to a group of undergraduates later this week, and wanted to include a diagram illustrating the technique of gluing paper. I couldn’t find anything useful on the web, so had to draw my own. Is it considered too basic to bother describing? Clean and efficient glue handling is one of the most fundamental skills in bookbinding, and a common place to make mistakes.
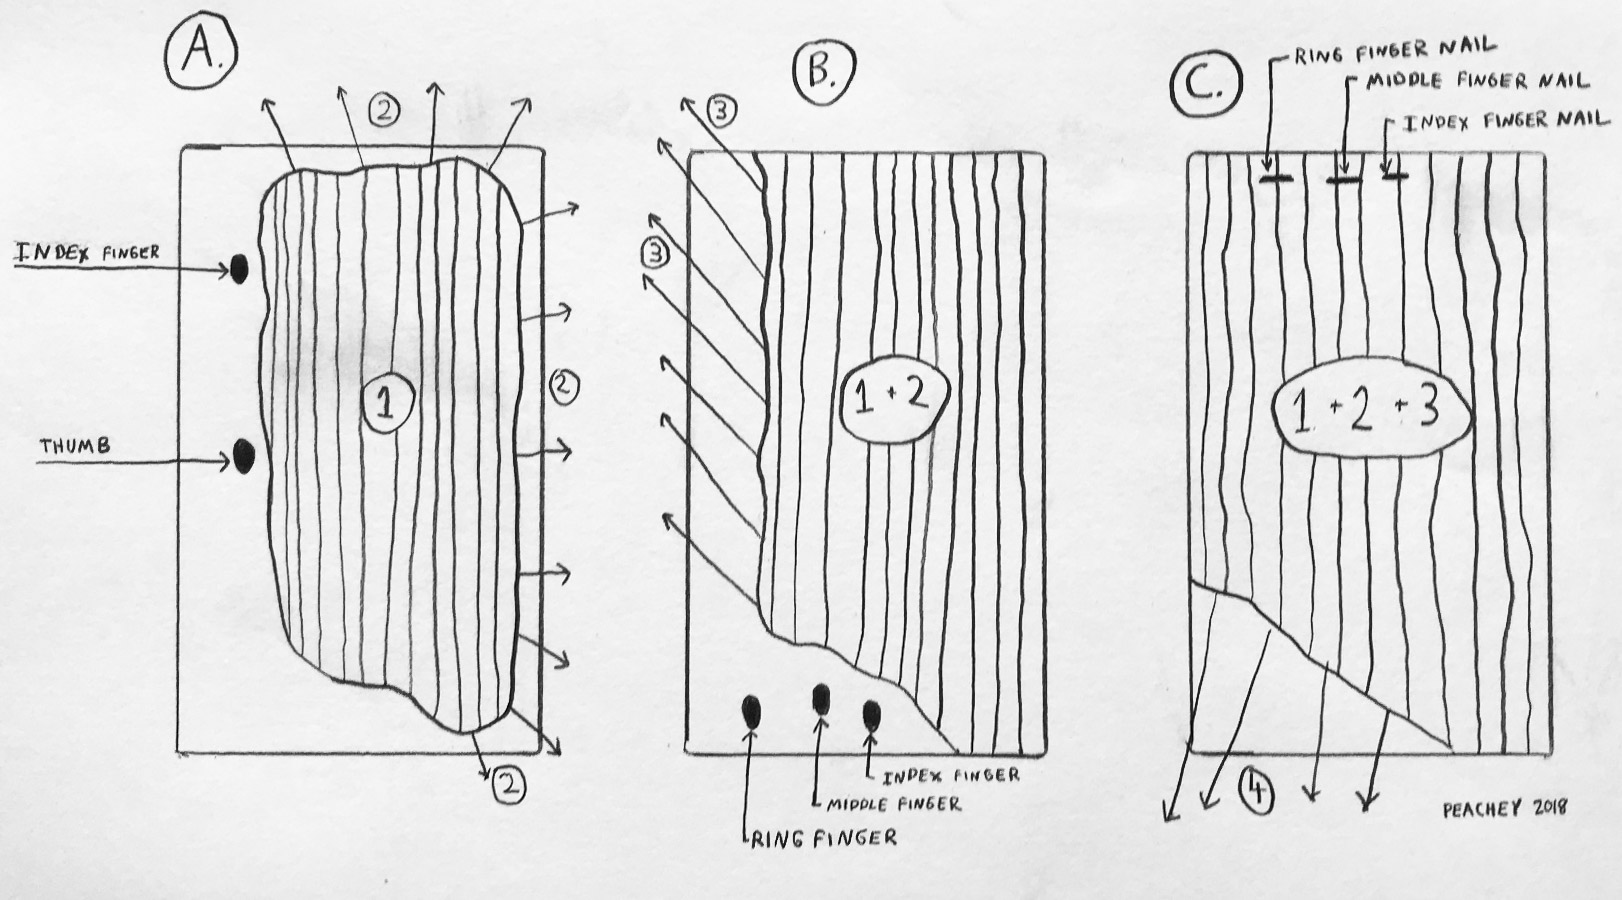
The sequence of applying adhesive to paper for a right hander. Click on the image to enlarge.
If your adhesive is the right consistency, your brush the right size, and it is charged appropriately, you should be able to cover the entire sheet without adding more. This is how I was taught by Thea Hamman, a German trained bindery supervisor who worked for many years at Columbia University.
A. Apply the adhesive to a large area in the center of the sheet of paper, which is placed on a larger waste sheet. Press down firmly with your index finger and thumb to keep the sheet from shifting. If the paper is large or highly reactive to moisture, you might want to relax it by misting with water. I usually jigger the brush back in forth in Area 1 during application. Make sure to put enough on to later drag it over the edges. Most commonly, I use a 1 inch Princeton 5450 Natural Bristle Brush. Since the adhesive is not on the waste sheet yet, if the paper happens to shift or expand a bit, the good side of the sheet remains clean. Next, brush the adhesive in Area 2, off the top and right side. If the paper expands or warps, hold it down so that it moves towards the left, so adhesive doesn’t get on the good side.
B. Move your hand and place your ring, middle and index finger on the bottom of the sheet, in the area where there is not adhesive, then brush the top left side. This can also help keep the sheet from curling into into itself. On small sheets, 1, 2, and 3 can be done at the same time. All of this depends on a balancing how fast you are working, how reactive your paper is, and how much moisture is in your adhesive.
C. Now place your fingernails fairly flat on the top edge, making sure not not to dent the paper. By using the flat parts of your nails, the adhesive doesn’t get on your fingertips. If you do happen to get a little glue on your fingers, it is useful to keep a damp rag nearby to wipe them clean. Finish spreading the adhesive and lift the paper near two opposite corners, and stick it in place. Smooth it down, starting in the center, working outward, with the part of your hands that is opposite your thumbs to eliminate any bubbles. This avoids your fingertips which now have adhesive on them. Then achieve firm adhesion by burnishing using a Delrin folder, or your weapon of choice.
Please comment if you have another preferred method!