
I’ll be teaching a hardcover pamphlet binding workshop to a group of undergraduates later this week, and wanted to include a diagram illustrating the technique of gluing paper. I couldn’t find anything useful on the web, so had to draw my own. Is it considered too basic to bother describing? Clean and efficient glue handling is one of the most fundamental skills in bookbinding, and a common place to make mistakes.
If your adhesive is the right consistency, your brush the right size, and it is charged appropriately, you should be able to cover the entire sheet without adding more. This is how I was taught by Thea Hamman, a German trained bindery supervisor who worked for many years at Columbia University.
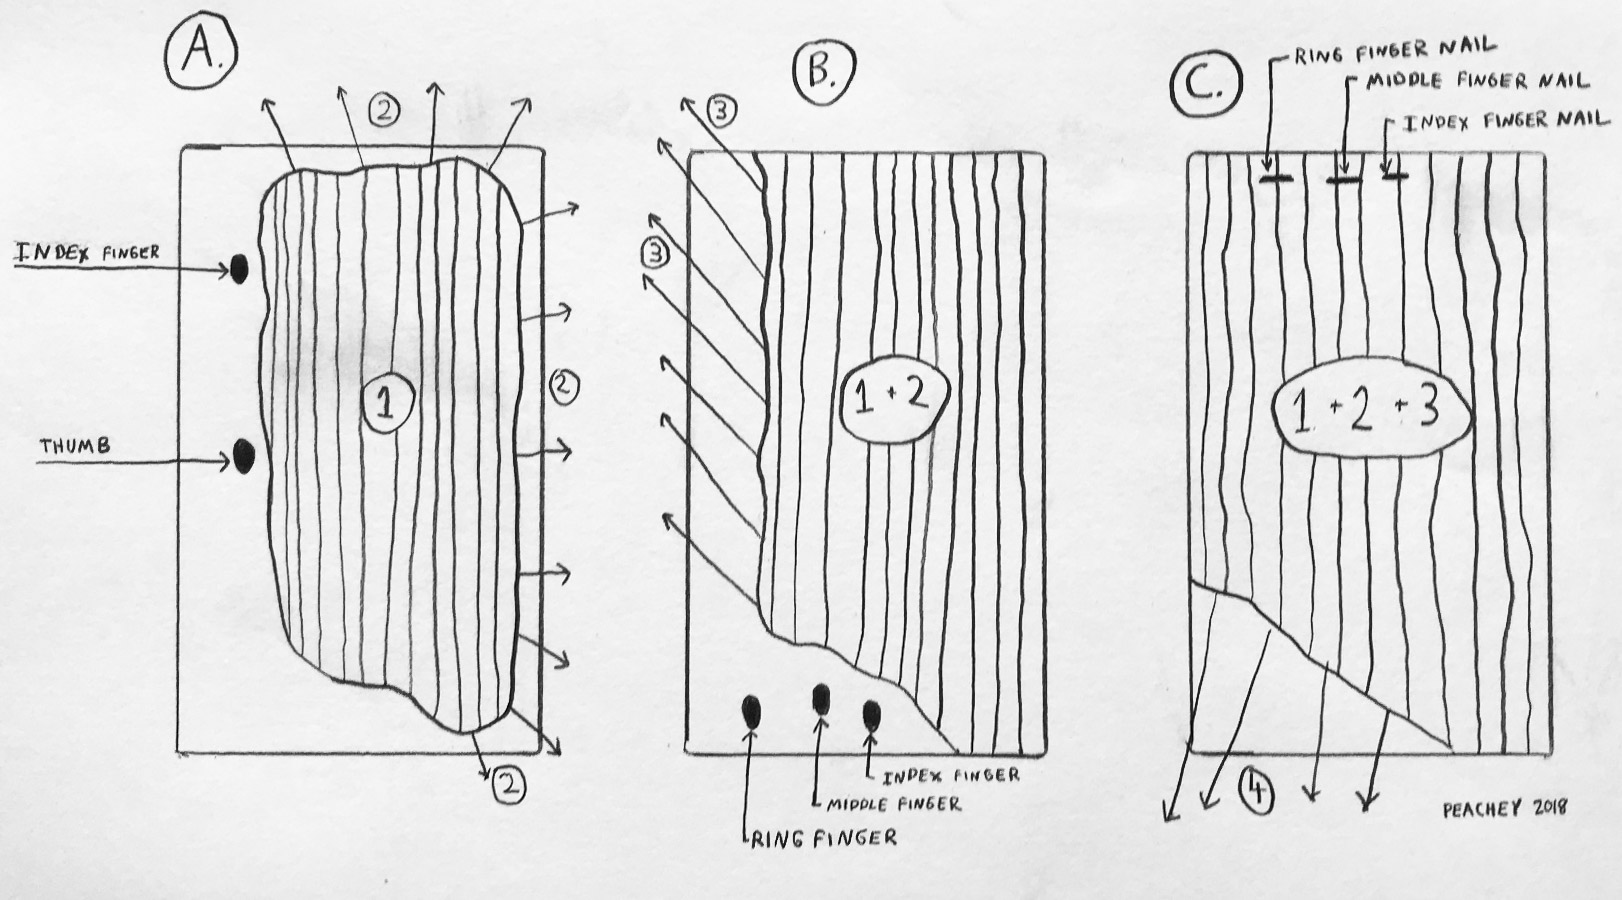
A. Apply the adhesive to a large area in the center of the sheet of paper, which is placed on a larger waste sheet. Press down firmly with your index finger and thumb to keep the sheet from shifting. If the paper is large or highly reactive to moisture, you might want to relax it by misting with water. I usually jigger the brush back in forth in Area 1 during application. Make sure to put enough on to later drag it over the edges. Most commonly, I use a 1 inch Princeton 5450 Natural Bristle Brush. Since the adhesive is not on the waste sheet yet, if the paper happens to shift or expand a bit, the good side of the sheet remains clean. Next, brush the adhesive in Area 2, off the top and right side. If the paper expands or warps, hold it down so that it moves towards the left, so adhesive doesn’t get on the good side.
B. Move your hand and place your ring, middle and index finger on the bottom of the sheet, in the area where there is not adhesive, then brush the top left side. This can also help keep the sheet from curling into into itself. On small sheets, 1, 2, and 3 can be done at the same time. All of this depends on a balancing how fast you are working, how reactive your paper is, and how much moisture is in your adhesive.
C. Now place your fingernails fairly flat on the top edge, making sure not not to dent the paper. By using the flat parts of your nails, the adhesive doesn’t get on your fingertips. If you do happen to get a little glue on your fingers, it is useful to keep a damp rag nearby to wipe them clean. Finish spreading the adhesive and lift the paper near two opposite corners, and stick it in place. Smooth it down, starting in the center, working outward, with the part of your hands that is opposite your thumbs to eliminate any bubbles. This avoids your fingertips which now have adhesive on them. Then achieve firm adhesion by burnishing using a Delrin folder, or your weapon of choice.
Please comment if you have another preferred method!

Nice diagrams! I have always used my finger knuckles to hold glued up paper in place. I find it works well.
Makes sense, less chance of denying the paper and farther away from your tips.
I wasn’t trained to glue by anyone, but seem to have developed the gluing method you show. It just seemed intuitively right, and -mostly- keeps the paper clean. (Every once in a while I get a little distracted and have a paper slip after there is glue on the waste sheet.)
Cool!
Good drawing
Thanks. First I tried to represent the finger placement by drawing an entire hand: big mistake!
Thank you Jeff! This is just about the exact method my mentor taught me. He studied at the UICTB, conservation, binding, and paper-making. His methods, including using the fingernails (slightly tilted so that just the nails and not the finger-pads) to hold the paper down. This is too late, but I do NOT consider this too basic to describe. Rather than let folks fumble and find similar methods, let them start with this good solid basic process, and modify for themselves, as necessary.
Good to know. Who was your mentor?
Or a more clever response should have been, Glad to know someone else is doing it right!