Tonkin Bamboo. Note the large areas of black power fibers. Compare this to the endgrain of a chopstick.
Hera are small Japanese tools useful for a variety of scraping, lifting, and delaminating tasks. They are common in paper conservation. Tonkin is a dense, flexible and strong type of bamboo that handmade fishing rods are made from. More about Tonkin. Heat treating increases the elasticity of the bamboo.
Even so, hera with very thin and flexible tips can wear and can crack, so they need to be maintained by sanding, carving, reducing the width, or even shortening. Once you have the skills to make a hera, they are easy to maintain. If you want to keep things simple, shape it with your Olfa knife, sand it with 220 grit, then finish it with 600 grit. More tips on shaping bamboo.
These blanks are roughly 6 inches long, and 1/4 – 3/8 inch wide. If you want to make two narrow hera, you could split a wider blank. Just ask me for the widest one I have. Making your own tools to the exact size and shape you need is rewarding and satisfying.
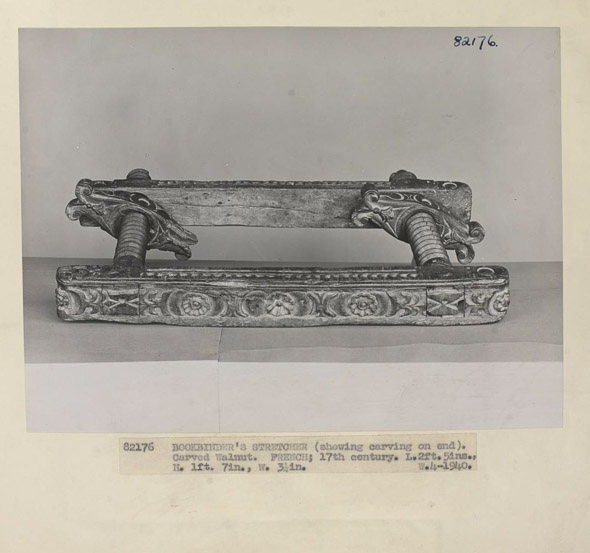
It would be nice to have a book stretcher on occasion, though. Need to turn an octavo into a quarto? No problem! But was this really a book press, or a press intended for some other purpose? The 29 inch long cheeks are very, very thin in profile, and I imagine would deflect quite a bit even with just hand tightening.
Hats off to the V&A has a very progressive large image use policy. You can download them instantly, share them widely, and even use them for publication. There are almost 750,000 searchable images on the V&A site. Let’s hope all institutions free their images.
Cigar presses are usually smaller than book presses, and often just half-arch, rather than full-arch. As such, they cannot generate as much pressure as a real book press. The one I purchased seems to have the compressional force of a typical copy press, which is adequate for the most common bookbinding tasks: firm adhesion of pastedowns, casing-in, and tray attachment when boxmaking. It wouldn’t be too difficult to modify a large C – clamp to make something similar.
Since they are lightweight, this one is about 30 lbs, they are great for teaching and travel. They usually have much more daylight than copy presses, again, useful when teaching, or for a secondary press. The main disadvantage is they only can be used for small format books.
Since cigar presses were originally used for pressing hand rolled cigars in long wooden molds, they often don’t have a top platen. I made a 7 x 9.5 inch aluminum one for this machine. Will I end up in conservation purgatory for drilling two holes in a historic machine?
Unmarked half-arch cigar press. I mounted a 7 x 9.5 inch aluminum platen on it.