The Cincinnati Press. A Perfect All-Around Tool

As most people interested in the physical construction of books know, the history of bookbinding is largely unwritten and the majority of the evidence resides in the material books themselves. This is why book conservators try to preserve as much of the physical information as possible for future study, interpretation, aesthetic enjoyment, artifactual value, etc….  Although bindings are usually not dated, the bookblock usually is, which allows us to get a general idea when a book was made.

Bookbinding tools, however, are rarely dated and are often missing provenance. Identifying national styles is often based on connoisseurship and morphological characteristics rather than hard evidence.  In many ways bookbinding tools are more difficult to research than a binding. Often the most information we have about a particular tool is the reminiscence of a current owner, something along the lines of, “well, I bought it from Binder Bob in the 90s, and that’s about all I know”. Tools often are given or sold between binders, and sometimes used for 100s of years.

It is important for conservators to document and understand the broader context of how books were made (the foundation of bibliography), including tools and equipment historically used to make the books, since book conservation is still closer to its craft origins than other specialities.

Background

In order to understand a press more fully that I used while teaching at the Preservation Lab of the University of Cincinnati, I asked Tim Moore to make a replica or model of it. For a while it was on the back burner. As is sometimes the case, the making of a replica evolved into both of us thinking through ways to slightly tweak and improve it. Making a replica involves more time spent carefully looking than even making a drawing, giving time to think through many aspects of an object. A more selfish reason was that I simply really, really wanted a press like this for my own use!


The Cincinnati Finishing Press from the Preservation Lab of the University of Cincinnati.

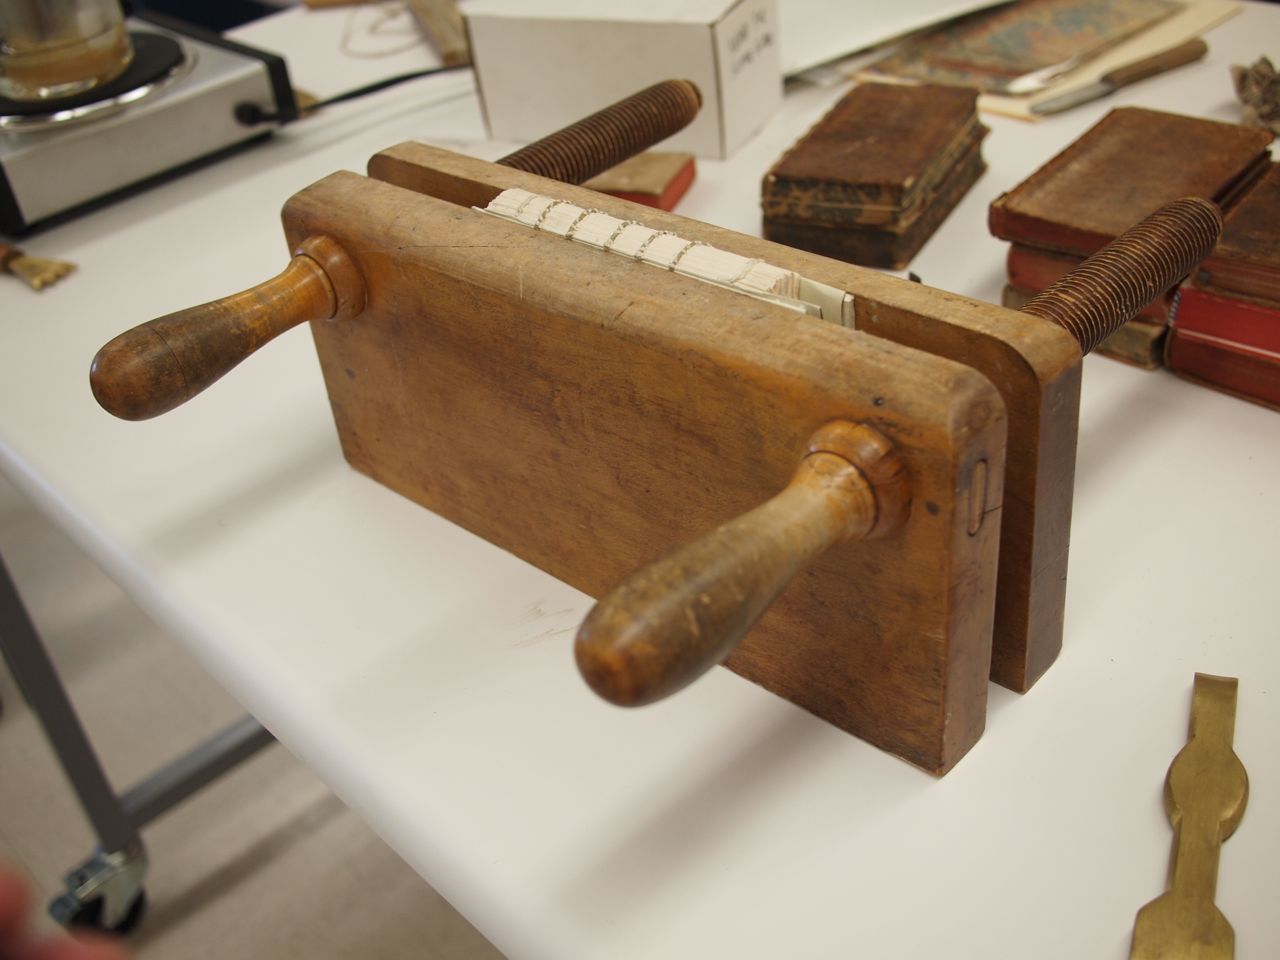
At first I wondered if this press was altered in some way, especially the shape of the top edge. On further reflection, I don’t think so, considering the symmetrical distance between the handles and the top and sides. Yet it is impossible to be certain.

We decided to call it The Cincinnati Press. Some may rightly attribute this name to a lack of imagination on our part. At least it is better than yet another eponymous Peachey this or that.

All aspects of this press are carefully chosen, and contribute to its function: the handle placement, overall size, cheeks, handle design, and our addition of tying-up pins.


The Cincinnati Press. I haven’t driven the key home so it is slightly proud on the end, and haven’t put in the retaining pin in.
Handle placement

The extreme placement of the handles close to the top edge is likely the defining feature of this press.  It allows for a lot of pressure right at the spine edge, and is perfect for smaller books, since the press is less likely to yawn. It also fits older books which are sometimes wedge shaped.
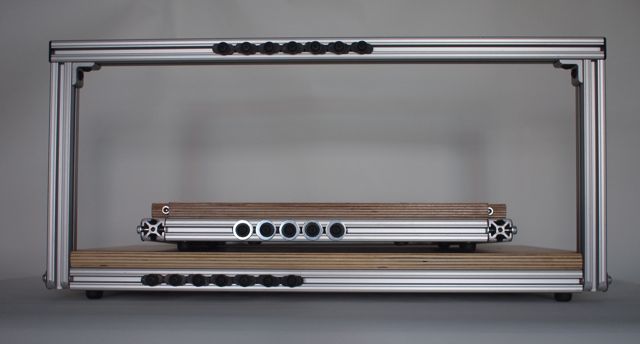
Size

The replica press is 7.5 inches tall. This height positions the book spine close to your eyes, which is convenient when removing or applying linings if you have poor sight like I do. I prefer presses like this that support the book completely, rather than narrower profile ones. There are 12 inches between the screws, which according to my own thoroughly unscientific non-survey fits about 92.5% of books I usually work on.

Cheeks

The 1.25 inch thick cheeks (aka “five quarters” in the lumber world) resist deflection when tightening,  The sharp radius at the top edge also adds strength just where you need it to clamp a book or textblock firmly. The press is heavy enough not to slide around on the workbench. It can be used to gently back a rounded textblock, if you use a froitture rather than a hammer.


The Cincinnati Press, end view. Note the radius at the top which adds considerable pressing strength when combined with the thick and ridged cheeks.
Handle Design

The handles are smaller than usual for a press like this. Tim explained his thinking about the handles in an email, “I had never considered reducing the shoulder on the wooden screw this much but I like it. As you pointed out it adds strength (less leverage on the margin of the screw shoulder). I suppose there may be greater wear on the outside press surface (more psi of pressure) but it’s probably not significant with hard wood.” The original has a wider profile shoulder which is vulnerable to splitting. A thinner shoulder is also more comfortable to grasp.
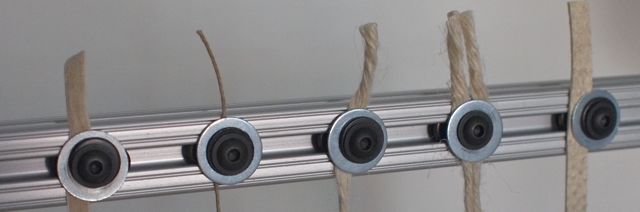
 

The Cincinnati  Press. Detail of the tying-up pins and Tim’s careful selection of wood..
Tying-up pins

One significant change from the original was the addition of tying up pins, which are very useful. Tim also rethought his usual style and angle. He writes, “I drilled the tying-up pin holes at 15 degrees. This was a shallow enough angle that I could get a good start with a brad point drill. I didn’t think the ‘Vee’ channels that I’ve been using would look so good on this press. I think this is probably the way to go in future, provided the 15 degree slant is sufficient. My thinking is trending simpler these days and the channels now seem superfluous.”

The few tests I have done seem to confirm that 15 degrees is more than enough to keep the tying-up cords in place, and the pins themselves do not get in the way when using the press for other purposes. They actually make tying and untying quicker, since the cords slip on and off more easily, rather than getting trapped in a steep angle.

Conclusion

As with all of Tim’s equipment, the Cincinnati Press is meticulously crafted and beautifully finished. The wood screws are the super smooth — you can almost spin them! — and I look forward to enjoying it for the rest of my career.

I think I will increase the diameter of the handles for my next one (!) to gain more torque when tightening. Tim considers this unnecessary, though, “I can’t decide whether increasing the diameter of the handle would actually increase the mechanical advantage. For instance most screwdrivers have rather small handles and there is some important relationship to hand size and grip that someone understands better than I. Many folks have smaller hands which might argue for smaller handles. Also, if you need the press really tight you can grab both ends of the screw with both hands for the final cinch.” For some reason when I am using any wood press, it seems more common that I grab the threaded portion to adjust it. Maybe we don’t need a handle, just a threaded rod?

It is by far the nicest finishing press I have.

*****

I keep thinking about some broader questions, applicable to all tools, that reconstructing this press brought up. Can a particular piece of bookbinding equipment  inform us as to the working procedures of binders? Could it affect how a particular book functions and looks? What would be the evidence for this? How can we better document provenance in the historic tools and equipment we use and collect?


In you would like more information about purchasing a Cincinnati Press, contact Tim Moore directly at: scobeymoore <AT> frontiernet <DOT> net

If You Desire Perfect Fitting Covers; or, the Joint Groove

The International Bookbinder, Vol. 2, No. 4 April 1901.  p. 14

This is an odd looking machine. The stand it is on resembles a typewriter or sewing machine table, which suggests to me it was used while the operator was seated. The foot clamp must open or close the jaws, which were also heated, if it is a gas line coming in from the back. The heat and pressure would soften the animal glue to define the cloth case on the bookblock. I’m not sure if 32 machines in use is impressive, or just a good start, or if any still exist. The cabinets under the table might contain different thickness of jaws for defining the joint groove.

The joint groove is the term Nicholas Pickwoad uses in his Language of Bindings dictionary of bookbinding terminology, and one that I especially like.  It is succinctly descriptive, yet comprehensible to users of older terminology (the French joint, the American groove) without attributing it to a specific nationality or time. It would sound odd to refer to a 17th century Dutch stiffboard parchment binding as having an “American groove”, for example. Reportedly a book based on the Language of Bindings website is forthcoming from Oak Knoll Press.

I recall from a college linguistics class that prescriptive language changes have a poor track record, since language tends to change transactionally and dictionaries usually record usage. Possibly it is different for a very small group of book people using specialized terminology. Will fuzzy language searches and the ease of sharing images negate some of the need for a very strict terminology?  Time will tell.

The Nokey Sewing Frame

“In European bookbinding the sewing frame or sewing press is an essential piece of equipment. The primary sewing–that which connects the quires of sections of a text-block– is the very foundation of binding, and I believe a well-consolidated, multi-quire text-block sewn onto bands can only be achieved by using a sewing frame.” Christopher Clarkson, ‘Thoughts on Sewing Frame Design for the Book Conservator’ in The Paper Conservator 19, 1995. (p. 41)


The earliest known representation of a sewing frame is found in the well known Bamberg Miniature, from around 1250.  During the past 750 years there have been few changes to its basic structure.  Essentially, a sewing frame consists of a base, two uprights and a crossbar which can hold the sewing supports at 90 degrees to the signatures while sewing. This allows the supports to be properly tensioned and keeps the entire text-block in precise alignment.  I find it is faster to sew a book on a frame and the sewing is more accurate for all types of supports– even if you are pre-piercing and using tapes.  Additionally, there is an ineffable satisfaction in using a piece craft equipment with such a long history, it makes bookbinding easier and more enjoyable. Many shortcuts in current bookbinding technique– one of them not sewing on a frame– tend to produce a book that can look and feel homemade, rather than handmade.

Despite the essential stability of the sewing frame as standard bookbinding equipment, there have been minor changes: the shift from the base being a table to portable, the Northern European addition of adjustable hooks, gated fronts, and cantilevered uprights,  the (French?) addition of a ‘tenter’, changes in the size and shape of the sewing keys, the use of manufactured woods and other materials for dimensional stability,  etc….  A candle holder, pictured in C. E Prediger’s Der Buchbinder und Futteralmacher, 1745, (reproduced in Mirjam Foot’s Bookbinders at Work) has to rank as one of the more creative improvements. It is only recently that sewing frames have changed significantly.

During the past 60 years or so, sewing frames seem to have the allure of a better mousetrap,  with inventive bookbinders and conservators rethinking some traditional formulations.  Sidney Cockerell used the idea of cantilevered uprights, but improved the rigidity of them by making them solid.  Chris Clarkson refers to this as the ‘Mark I’ style sewing frame.  I believe John Corderoy, in the 1967 Bookbinding for Beginners was the first to mention a folding sewing frame on page 21.   Later Roger Powell created a unique key slot that permitted the supports to be strung at the front of the base, making starting the sewing much easier, and was possibly the inventor of cushioned sewing boards.   Chris Clarkson and Peter Clothier in 1992 contributed several more improvements with their Mark III  sewing frame.  Laurenson-Stuart also made a non-adjustable cantilevered frame modeled in the Cockerell design, which was sold by Hewit & Sons in the 1990’s. Phillip Smith created a single post frame,and a clamp-on version. Most recently,  Tim Ely  has invented the Dreadnaught and Scout,  a modern rethinking of the cantilevered design, made with modern materials, outfitted with a rear view mirror and ‘anubis’ clips to hold supports.  Some  who have caught the sewing frame bug– such as Tim Moore, Keith UramRobert Walp, and Frank Weisner— are not tempted to improve on the traditional design, but are making well crafted, high quality hardwood frames with a modern aesthetic.

Yet the siren song of the sewing frame inspires some truly bizarre ideas– for example, here is a sewing frame made from an old book— conceptually clever, yet I can’t imagine it is actually rigid enough to function, but the author claims it also works as a piercing jig. For some reason, there is also an odd tradition of using the legs of a chair, in this image the chair is placed flat on a table, and the book attached between the legs, from the front to the back, under the seat.  Halliday’s 1930 Bookbinding as a Handwork Subject contains two additional variants of this unfortunate approach; using the chair upside and using the bottom of the seat as the base, and using the chair upright and attaching the supports to the back of the chair.

Ruth Zechlin, Werkbuch für Mädchen und für alle die Freude am Werken haben, 1961 (first edition 1932)

The tradition seems to be not just confined to America and the United Kingdom, Peter Zillig sent me the above  German example, I presume from the 1932 edition, but am not sure.  It looks like the opposite side of the chair is also strung up, perhaps for a ‘dos-a-dos’ binding?  I’m surprised no one has claimed chair/sewing frame as a combination book press/ sewing frame– after sewing, one could simply sit on the book to press it.  Of course, a simple frame is relatively easy to construct, if you have a few hand tools– drill, saw, router, sandpaper– and some basic woodworking skills, like this one I made  with metal rod uprights.

Many book arts suppliers also offer inexpensive traditional looking wooden versions, though they should be carefully inspected for quality– at least make sure the center of the crossbar coincides with center of the slot on the base and the screws turn smoothly.  Older frames, due to poor storage, are sometimes too loose and warped, which can interfere with accurate sewing.  Also, when evaluating a frame, make sure the  uprights are at 90 degrees to the base and crossbar is rigid. If it deflects, each time you tension a support, it will change the tension on the others.  A few broken or chipped wood threads are common and will not interfere with the action of the nut.  If a wood nut is very tight, the threads need to be filed or sanded slightly larger.

***

I began to make and think seriously about sewing frames in 1997, during a week long Mellon Advanced Conservation Workshop held at the University of Iowa, co-taught by Joel Spector and Tom Conroy.  I made two wood frames– a full size German style cantilevered press, and a smaller, traditional English style.  I’ve also made a dozen of the portable frames, similar to the one  pictured above, for a class I taught at PBI.  My interest in frames was rekindled when I saw a Hickock Blank Book sewing frame, with its easy to use T-slot adjustment mechanism for attaching sewing supports.

A major,  inherent problem with all previous sewing frames is that they are awkward to store when not in use;  often they are placed on a high shelf, difficult to access and exposed to excessive heat and dust, or have to be disassembled, which is also a pain.  I suspect these inconveniences sometimes keep them from being used.  I often found sewing keys difficult.  I borrowed the t-slot idea from Hickock, supports that attach to the front of the base from Powell, added advantage of folding uprights solidly constructed out of aluminum, and The Nokey Sewing Frame was born.

***

THE NOKEY SEWING FRAME

Fig. I: The Nokey Sewing frame strung up with a tape, thin cord, thick cord, double cord and slit thong.

Fig. II: The Nokey folded.

Fig. III: Hex head adjustment driver.

Fig. IV: Close up of buttons with various supports.

Fig. V: Bottom of Nokey, folded,  with 12 inch ruler.

Fig. VI: Large Nokey open, small Nokey closed on top.

***

ADVANTAGES OF THE NOKEY SEWING FRAME

1. Nokey means easy to set up and quick adjustment of  spacing for all types of sewing supports- tapes, single and double cords, thongs, etc….

2. Folds flat for convenient dust free storage and transportation, only 2.25″ thick.

3. Solidly constructed of aluminum and plywood. Zero deflection, this is the strongest sewing frame ever made.

4. Uprights stop at exactly 90 degrees, and can be adjusted.

5. Sewing starts at the edge of the sewing board, making it easy to begin sewing and sew in the round.

6. Rubber feet keep even small size frame from sliding around on the bench.

7. Minimum distance between supports: 1 inch.

8. Buttons which attach supports tighten and loosen with a 5/32″ simple hex head driver, which is included.

9. Partially sewn books can be quickly removed and replaced, which make the Nokey ideal for  schools.

10. Custom sizes and additional buttons available, please inquire.

“Nearly 40 years ago I made my first sewing frame out of scrap wood.  It rocked back and forth like an old table but it taught me the value of the sewing frame as a tool and I’ve never been without one since.  I now have three in my shop.  The Nokey Sewing Frame is a real innovation, taking the best of a traditional design and adapting it to new materials and needs. It is actually fun to use.  The button screws make for very fast and easy setup.And it’s versatile enough to accommodate nearly all the variations on supported sewing I can think of for general bookbinding as well as conservation work. Well designed and well made with high quality materials, this is quite simply a great tool.”

-John Townsend, (aka Anonymous Bookbinder)

*

UPDATED 21 NOVEMBER 2015: I’ve changed the design slightly, see the “Tool Catalog” section of this blog for prices and how to order.


%d bloggers like this: