Montefiascone Project 2020

Another fantastic looking lineup for The Montefiascone Project 2020!  I will be teaching there week two, with a workshop titled “Early nineteenth century American and English bookbinding: machines, materials, structures, and tools” Monte is a special experience, everyone should go at least once.

The early nineteenth century models we will make in my workshop. A common boards binding, an extra boards binding, a tight back cloth binding, and an English style cloth case binding. We will also make dyed and textured book cloth from natural muslin.

…..

Montefiascone is a small medieval walled city about 100 k (80 miles) north of Rome, on Lake Bolsena. Since 1988, conservators, curators, art historians, book artists, and others interested in books and their history have come together to work, to learn and to enjoy this special place.  Participants come to enjoy the medieval architecture, friendly people, a clean accessible lake, books and scholarship.  The Montefiascone Project is a non-profit making organisation, set up to fund the restoration of the Library of the Seminario Barbarigo in Montefiascone. Participants may attend one, two, three or all four weeks.

Costs are £550 (or euro equivalent) for each week and include all lectures (which are in English).  For more information and to enroll, contact Cheryl Porter: chezzaporter <at> yahoo.com

Week 1: 27th – 31st July

Recreating the colours on the Medieval palette: Western, Hebrew and Islamic.

Course Tutor: Cheryl Porter

This class will study the colours (made from rocks, minerals, metals, insects and plants) that were processed to produce the colours used by artists throughout the medieval era.  The focus will be on manuscript art – Islamic, Hebrew and European. Participants will re-create the colours using original recipes.  Illustrated lectures will address history, geography, chemistry, iconography and conservation issues.  Practical making and painting sessions will follow these lectures. No previous experience is necessary.

Week 2: 3rd – 7th August

Early nineteenth century American and English bookbinding: machines, materials, structures, and tools.

Course Tutor: Jeffrey S. Peachey

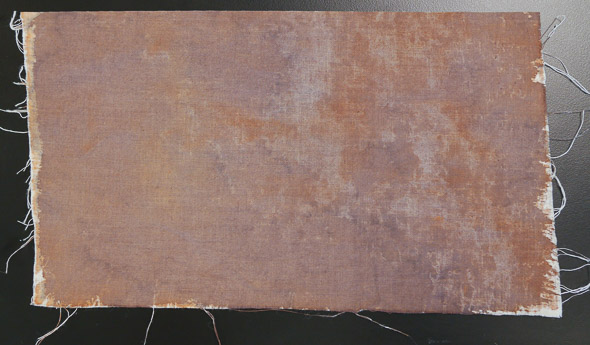
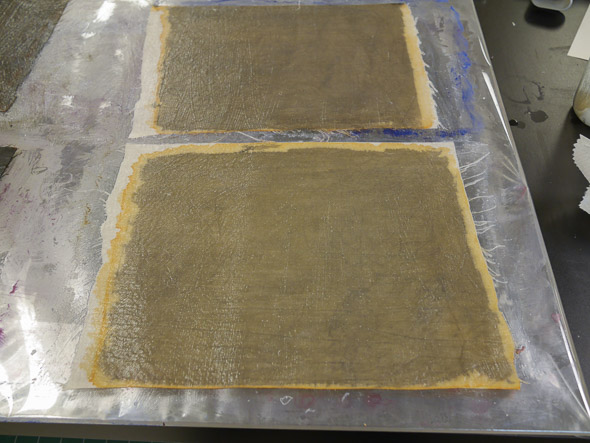
In England and America, common book structures changed significantly during the early nineteenth century. A typical inexpensive calf or sheep binding was supplanted by even cheaper, new binding styles, such as paper boards bindings and the three-piece adhesive cloth case. In industrial binderies, the plough was replaced by two quicker machines, the guillotine and the board shear. The way binders worked, and viewed their work, also changed drastically.

We will examine this time period through PowerPoints, readings, discussions, and the hands-on construction of four models: an English common-boards binding, an American extra-boards binding, an American tight-back cloth binding, and an English adhesive cloth case. We will explore methods of replicating plain and textured nineteenth century bookcloth, starting with undyed muslin. Close readings from bookbinding manuals, analysis of bindery images, and the use of historic tools will enhance our understanding of this important time period. Often these binding styles are referred to as “temporary” and we will debate some conflicting evidence and definitions of this term. By the end of the nineteenth century, the cloth case became ubiquitous worldwide. This workshop will equip participants to better understand, interpret, and sympathetically treat nineteenth century books they encounter.

Week 3: 10th – 14th August

Recreating a late sixteenth-century Cambridge bookbinding

Course Tutors: Jim Bloxam and Shaun Thompson, with lectures from David Pearson.

Cambridge, heavily influenced by its university, has always been a place with books at the heart of its activities; a place where they have for many centuries been printed, sold, bound, owned, stored, read and used. Our Montefiascone course, a few years ago, was devoted to making a model of a late 15th century Cambridge binding; this year we will analyse a binding style from a century later and construct a model of a typical late 16th century Cambridge binding.  At the end of the 15th century, leather-covered bindings usually had wooden boards and clasps and decoration depended on labour-intensive repetitive tooling using small hand-held tools.  A century later, wood had given way to pasteboard or pulpboard, clasps had been replaced by cloth ties and decoration looked very different; gilt tooling, unknown in English binding work before about 1520, had become common.

Week 4: 17th – 21st August

A Chinese Qur’an

Course Tutors: Kristine Rose-Beers & Cécilia Duminuco, with a lecture from Alison Ohta

During this class, participants will make a model of Chester Beatty Is 1602, a 17th or 18th century Chinese Qur’an with its original binding. This small manuscript is distinctly Chinese. It is covered with fine patterned silk, and the pages are made of soft, fibrous, Chinese paper. In keeping with many Islamic bindings, it has an envelope flap, but this is squared off, similar to those seen in some south-east Asian Islamic manuscripts. This Qur’an is an example of how aspects of the Islamic book were combined with local decorative traditions influencing ornament, calligraphy and illumination.
According to the historical accounts of Chinese Muslims, Islam was first brought to China by Sa’d ibn abi Waqqas, in 651. Although scholars have not found any historical evidence that he visited China, they agree that the first Muslims must have arrived in China in the 7th century, and that the major trading cities, such as Guangzhou, Quanzhou probably already had their first mosques built during the Tang Dynasty.
Muslims in China have continued to practice their faith sometimes under very difficult circumstances. Today, the Muslim population of China is estimated as representing 0.45% to 2.85% of the total population with 39,000 mosques serving this congregation.  This Qur’an represents the Islamic legacy in China and is a unique opportunity to examine this combination of traditions which were carried along the Silk Roads over the centuries.

COURSE INSTRUCTORS:

Cheryl Porter is Director of the Montefiascone Project. She trained as a book conservator in London and has worked as a conservator, collections manager and consultant for libraries and museums in Europe, Australia, USA and Egypt. She was deputy Director of the Dar al-Kutub (National Library) and Thesaurus Islamicus Foundation Manuscript Project in Egypt from 2008-2011. She has published widely and is a Professional Associate in the American Institute for Conservation.

She is currently commissioned by Yale University Press to write a book on the colours used to paint in manuscripts.

Jeff Peachey is an independent book conservator and toolmaker based in New York City. For more than 25 years, he has specialized in the conservation of books for institutions and individuals.  He is a Professional Associate in the American Institute for Conservation, has taught book conservation workshops internationally, and has been awarded numerous fellowships to support his book history research, including the Rockefeller Foundation Bellagio Center (Italy) and Rochester Institute of Technology’s Cary Collection (New York). He is a Visiting Instructor for the Library and Archives Conservation Education Consortium (LACE) of Buffalo State University, New York University, and the Winterthur/ University of Delaware. “Ausbund 1564: The History and Conservation of an Anabaptist Icon” is his latest publication.

Shaun Thompson is a traditionally trained bookbinder with over thirty years’ experience and a passionate advocate for the importance of hand bookbinding skills in book conservation. He has worked for Cambridge University Library for the past 17 years and presently holds the position of Collection Care Manager.

Shaun has a research interests in early northern European book structures and has made good use of the Library’s collections to examine the physical aspects and historical techniques used in medieval bindings. He is also an experienced and highly skilled practical teacher, having taught hand bookbinding to conservation students in the UK, at both West Dean College and Camberwell College of Arts. He taught courses at Montefiascone since 2013 and is looking forward to returning to share his ever-widening knowledge and experience.

Jim Bloxam, Head of Conservation and Collection Care, Cambridge University Library, UK. Jim is an Accredited Conservator of the Institute of Conservation. His particular research interests lie mainly in the history of books; their structural qualities and their cultural context. He has taught historical book structures in the UK, Europe and the US, focusing mainly on European book structures.

David Pearson retired in 2017 as Director of Culture, Heritage and Libraries for the City of London Corporation, after a professional career of 35 years or so working in various major research libraries in London and elsewhere. He is now a Research Fellow at the Institute of English Studies in the University of London, and a member of the teaching staff of the London Rare Books School there. He has published extensively on aspects of book history, with a particular interest in aspects of the book as an owned and designed object; his books include Provenance Research in Book History (1994), Oxford Bookbinding 1500-1640 (2000), English Bookbinding Styles 1450-1800 (2005), and Books as History (2008). He has taught and lectured in these fields for numerous audiences and is a Past President of the Bibliographical Society.

Kristine Rose-Beers is Head of Conservation at the Chester Beatty in Dublin and an accredited member of the Institute of Conservation. Her research interests include the conservation of Islamic manuscript material, early binding structures and the use of pigments and dyes in medieval manuscripts.

Before moving to Ireland, Kristine worked at the Fitzwilliam Museum in Cambridge as Assistant Keeper (Conservator of Manuscripts and Printed Books); at the Chester Beatty Library with a particular focus on the Turkish manuscript collection; and at Cambridge University Library. She graduated from the Conservation programme at Camberwell College of Arts in 2002 and is a member of the Board of Directors of The Islamic Manuscript Association.

Cécilia Duminuco is a book and paper conservator. She graduated from the École Supérieure des Arts Saint-Luc of Liège with a Masters in Painting Conservation in 2013, before completing a Masters in the Conservation of Books and Library Materials at West Dean College in the UK in 2015. Cécilia joined the Chester Beatty in Dublin as Heritage Council Intern in Conservation 2015-16, before moving to Cambridge University Library to work on Charles Darwin’s Library digitisation project. She then worked at the University of Manchester, before returning to Cambridge University Library in 2019 to work on the digitisation of Greek Manuscripts. Cécilia  has now relocated to Belgium where she continues to follow her passion for early bookbinding, non-Western book structures, pigments in illuminated manuscripts and painted surfaces.

Alison Ohta is currently Director of the Royal Asiatic Society of Great Britain and Ireland.  She completed her thesis at SOAS (London University) on Mamluk bindings and has published and lectured extensively on the subject.


Replicating Early Nineteenth Century Book Cloth: XSL Pigments to Stain Muslin

Fig.1. Left: The Beauties of Lord Byron. 2nd Ed. Philadelphia: T Desilver & Towar & Hogan, 1827. Right: XSL pigment stained muslin being prepared for rebacking.

OVERVIEW

I’ve been investigating ways to create a sympathetic replica of early nineteenth century book cloth using Kremer XSL pigments and unbleached muslin. This technique also involves suspension staining and resizing the cloth with starch paste. Uses for this cloth include rebacking, recasing, in-situ repairs of damaged bindings, board slotting, and the making of early nineteenth century historic models. Preliminary results are quite promising, though there are a few caveats. Future experiments will investigate XSL pigments for staining leather.


EARLY BOOK CLOTH

Publishers’ book cloth started in the 1820s.  Originally it was undecorated, faded quickly, attracted dirt, and over time became brittle. The book structures it was used on were traditionally considered “temporary”, were cheap and insubstantial, and as a result many examples have been rebound. Most studies of nineteenth century bookbinding focus on attractive and visually interesting aspects of book cloth that begin in the 1840, such as gold stamping and cloth grain patterns. Until recently, these early cloths have been overlooked by historians. It is doubtful that three piece adhesive case binding (aka. the hardcover) would have become the dominate rigid board book structure without book cloth.

Many examples of early cloth, searchable by year, can be found at The Library Company of Philadelphia’s wonderful online database of nineteenth century cloth bindings.  Another easy to use visual resource is The Publishers’ Binding Online, where you can browse by the decade. But the best thing is to get to the nearest library and examine some actual books. Images cannot substitute for this.

John Carter, in his classic essay, “Origins of Cloth Bindings” recounts the moment of the innovation: a conversation in the 1820s between Mr. Pickering (the publisher) and Mr. Sully (the binder), with Mr. Pickering expressing a desire to cover a boards binding with something a little “neater”, like a blue calico window curtain that was hanging in the room. Since this event was recalled and recorded first in the 1850s, some leeway should be ascribed as to the details of this encounter. But it’s a good read.

English use the term “calico” for a cloth that in America we call it “muslin”, though some claim calico has a lower thread count. Confusingly, in America “calico” can also refer to a floral printed muslin. Floral printed muslin is ocassionally found on early American imprints, though these are invariably an owner’s repair, not something issued by a publisher.

In any event, there is nothing currently commercially available that reproduces the look and feel of early book cloth. And many books from this time period have been insensitively rebound, are damaged, and are now quite valuable historically and monetarily. Like the 1833 first American edition of Frankenstein in “muslin backed boards” for $35,000.00.  Once books reach this kind of value, collectors, dealers, and institutions become more interested in having them conserved. Good news indeed, for independent book conservators like myself!


WHY XSL PIGMENTS?

The original impetus for investigating Kremer XSL pigments arose from problems with existing methods of dying and staining cloth. I ran across an informative pdf from Kremer Pigments, which described using them as wood stains. If it worked for wood, I thought, maybe textiles and possibly even leather?

Then I found a series of excellent blog posts from an American Museum of Natural History Conservation project, called In Their True Colors. Conservators investigated Orasol and XSL pigments.  For their project, which involved recoloring faded fur on taxidermy specimens, they chose Orasol. It dissolves in alcohol, which facilitated introducing as little moisture as possible, in order to airbrush the fur in-situ. But the consideration of XSL pigments in a conservation context piqued my interest.


FIG. 2. Proportions for various concentrations of XSL pigments for staining wood. Seeing this his made me curious about possibilities for fabric and possibly leather. Source: http://shop.kremerpigments.com/media/pdf/26000-26600e.pdf

I’ve had difficulty with the usual methods of dying cloth, and some require extensive set up and clean up. Fiber reactive dyes, such as Procion MX reactive dyes, can be difficult to control and mix, and as the name implies, they react with all nearby fibers. Consider yourself warned.  Direct dyes, such as Ciba-Geigy direct dye Solophenyl are also difficult to control, requiring heat and pH monitoring to apply. Traditional leather dyes, like Feibings, are very fugitive and not used in modern conservation. Aniline leather dyes can also be quite fugitive. Currently it is impossible to import the common dye used in book conservation labs, Selladerm dyes into America from the Leather Conservation Center in England due to customs regulations. Thinned Golden airbrush paints can change the surface and feel of cloth to an unacceptable degree, though for later nineteenth century heavily sized and textured cloths this works quite well. Book restorer Vernon Wiering is doing some interesting graining of cloth  — I would guess with acrylic? — but he doesn’t detail the techniques or materials in his blog posts. Watercolor, gouache, and raw pigments generally don’t penetrate well into fabric. What to do?


Fig. 3. Rock solid lightfastness according to the manufacturer. This should probably be tested: any grad students looking for a technical analysis project?  Source: http://shop.kremerpigments.com/media/pdf/26000-26600e.pdf

Kremer XSL pigments are a relatively new pigment treated with a dispersing agent so that they solubilize almost instantly in water. They also remain in suspension once mixed. The unidentified dispersing agent, which coats the pigment, is possibly the only conservation concern. Anecdotally, I have heard these pigments are used in color field painting conservation. The earliest citation concerning them on the web I’ve found is 2006. I emailed Kremer asking for information about their history and received no reply.

They are extremely lightfast, as seen in Fig. 3. They are relatively inexpensive with a complete set selling for about $90.00 from Kremer Pigments.  Since they easily disperse in water, there are no solvent fumes to deal with. Because of their high tinctorial strength, a little bit goes a very long way. Clean up is easy since there is no binder.

I find it easier to mix a specific color with them, because I am more used of dealing with pigments and paint, rather than dyes.


Fig. 4. Enlarged image of XSL Cobalt Blue (#26400). You can see the coated pigments which look like little airgun pellets, though some other colors are more spherical. A side benefit is that they are quite large and heavy, therefore less prone to become airborne.

MUSLIN

Since the earliest publishers’ cloth bindings were covered with a thin cotton, it made sense to start with modern muslin. It is sometimes called “airplane cotton” since it was used to cover wings on early planes, notably the 1903 Wright Flier. Unbleached muslin is available from a number of sources online, I ordered from Online Fabric Store, and it cost about $3.00 a yard. The coarsest thread weave I’ve found is 60 x 60. A better match for older cloths would be something coarser and more irregular weaving pattern.

Modern muslin contains sizing or other additives that can interfere with the staining. It is best to machine wash the cloth. Wrinkling and folds can also interfere with even staining, so I dry it on a sheet of plexiglass. This way the warp and weft can be aligned or intentionally misaligned to match an irregularly woven older cloth. If necessary, iron it after removing from the plexiglass to make sure it is as flat as possible before staining.


Fig. 5. Drying the washed muslin on a sheet of plexiglass.

SUSPENSION STAINING

For the toning and drying I used a technique based on one from the polymath Elissa O’Loughlin, a retired Walters Art Museum paper conservator, owner of Wren Haven Tools, maker of brass triangles and remoistenable tissue, a pressure sensitive tape historian, a pocket knife aficionado, &c., &c. She uses suspension staining to airbrush pigments on Japanese tissue. I highly recommended this workshop.

In this case, the wedges are folded corrugated board with a small weight inside to keep them in place, as seen in Fig. 6. I suppose taller wedges would dry more quickly. The ends of the fabric are clamped between pieces of binders board using binder clips. I tried applying the pigments by brushing and by immersion: there wasn’t much difference between the two. At some point I will also try to using an airbrush to apply the pigments. I suspect the method of application is less important than having a clean substrate.


Fig. 6. Suspension staining. This is a great way to stain tissue and fabric. Using an airbrush might give even more control when building color to a desired result. I also immersed a few samples, then dried them as pictured above. There didn’t seem to be much of a difference in the final product.

Drying the cloth flat on a piece of plexiglass can result in extremely uneven coloring, as seen in Fig. 7. I think this is because some of the pigments move more than others in the cloth while drying. Also, if there are folds or wrinkles pigments can collect unevenly in these areas.  If the cloth is not adequately washed, additives can affect color absorption. Then again, some variation might be desirable if the intent is to simulate an older cloth.

Even with suspension staining, there is some unevenness in the final color, so if you need a dead even surface, use a different material or method of dying.  If color matching is not critical, nineteen very evenly dyed colors of thin 100% cotton is available from Creation Baumann, though the weave is exceedingly fine.


Fig. 7. Without suspension staining, the pigments pool and dry very unevenly. This may be useful if you are an artist trying to replicate a cloudy sky scene!

Suspension staining facilitates an even application of the XSL pigment/water mix, since there is no pooling, and creases don’t develop when the muslin expands or shrinks. If the muslin expands slightly, the weight of the binders board and clips keeps the fabric moderately taut. Muslin shrinks back quite a bit when drying — which is why it was a good material for airplane wings — and the light weights let it move a little, while maintaining slight tension so it doesn’t pool. The color intensity is stronger with this method than with hang drying, as well as being more economical, since the color doesn’t drip off the end.

Ideally the weight of the binders board and binder clips should be matched to the wet strength of the suspended cloth or tissue, though maybe I’m overthinking this aspect.  To suspend tissue a much lighter weight should be used. The top edge of the corrugated board wedge was covered with packing tape so the fabric could move and not wick away the pigment. Suspension staining allows the material to dry fairly quickly without additional handling, since both sides are exposed to air.


Fig. 8. I think the muslin wasn’t adequately washed, which created this uneven absorption, in addition to the Dioxazine Violet which moves quite easily in the fabric.

I haven’t rigorously tested all eleven XSL pigments, but some are more prone to move while drying than others.  The Dioxazine Violet (#26410) as seen in Fig. 8 is especially volatile. Too thin a pigment/water solution also absorbs less evenly. Adequately washing the muslin in the beginning is the most important factor. There is less wrinkling and distortion if you wash the whole piece of cloth before cutting it into smaller pieces. Still, for reasons I can’t always explain at this point, occasionally the absorption is shockingly uneven, which is most irritating. Staining a much larger piece than you need would be smart, so you can cut the heart out of it. I haven’t been this smart, yet.


Fig. 9. Building up layers of paste. Three layers seem suffice to build a substantial coat, letting it dry between layers.

After the cloth is dry, I size it with wheat starch paste on a piece of plexiglass covered with some mylar to make clean-up easier. First, I put a thick layer on what is the back and adhere this to the plexiglass. Then I build up two or more thin layers on the front, letting it dry in between. Fewer layers makes a more natural surface, if this is what you want. Even more layers fill the space between the treads, eventually making the cloth look like a modern “linen finish” buckram.

It is easier to mix up a batch of fairly thin paste — somewhere between heavy cream and Greek yogurt — than thin down a thicker paste. Slightly warm paste penetrates into the cloth better. Too many many layers, or too thick paste, can cause the cloth to crack when folded, as seen in the middle of FIg. 10. If you don’t want this to happen to the hinge of your book, stay thin.


Fig. 10. If the starch paste is too thick, or there are too many layers, it will cause the cloth to crack when folded. I put seven layers on this sample to exaggerate the effect..

Somewhat surprisingly, the pigment didn’t seem to rub off much even before sealing with paste, unless it was colored with a very dark pigment. I even washed one sample after staining, and although the color became more dilute, but it didn’t wash out completely. The paste gives the cloth enough body when applied to a book.  If the pigment does move when applying the paste, I suppose a few drops of Golden airbrush acrylic medium in the water/ pigment slurry would help seal it in place.

The weak bond between the XSL pigment and muslin can be easily removed by slightly dampening and/or lightly scraping the surface to achieve visual integration. Colored pencils or other pigments could also be used to achieve visual integration.


Fig. 11. Once the paste on the back of the cloth dries on the plexiglass, glass, or mylar, it forms a barrier that makes the cloth much easier to handle when applying adhesive for covering. The small swatch shows the color and appearance on the front of the cloth.

COVERING

Animal protein glue is traditionally used to adhere the cloth to the book or the boards. The cloth often stretches a little bit when gluing it to the boards or book,  and this distortion is seen in historic examples, especially on the turnins where it is pulled tight. The muslin shrinks while drying it also molds itself to the board edges, making them look quite crisp. The combination of glue and paste make for a stronger bond than paste alone. Hide glue creates a wonderfully stiff feel to a book, even with thin boards.

One problem — which is also mentioned historically — is that the glue can strike through and leaves a permanent stain, as seen in FIg. 11. To prevent, or minimize this, the glue needs to be at the right temperature, and applied by stippling, so that it absorbs as evenly as possible into the fabric. The strike through is often more noticeable on lighter colors. It doesn’t happen all of the time. I still can’t predict it, which is frustrating.


Fig. 12. This is an example of the animal glue striking on a tightback cloth binding model. For some reason, the glue struck through much less on the spine reinforcement strip, where a sheet of paper extends on the bottom fifth of the image, than on the board itself. I’m not sure why, since I glued the cloth for both.

I wonder why early nineteenth century bookbinding manuals always mention using glue. I should test more actual samples, but testing for starch is destructive, and it can be impossible to differentiate when the starch was applied; cloth, boards, or surface size. Since historic cloths were often a looser and coarser weave, any strike through must have been even more problematic. This needs more investigation.

One practical way around this problem is to use paste instead of glue. Although not historically accurate, if the paste does strike through, when it dries it will blend with the paste filled cloth. Paste is easier to use, and traditional when covering with leather and paper. Paste makes the muslin more stretchy and difficult to handle, which also could be a reason it wasn’t used. Glue seems to dry a bit quicker, but there are many variables in hygroscopy. But if a little paste squeezes out when covering, it doesn’t stain the surface. The XSL stain itself may be the culprit. This is a good example of how recreating a historic technique with modern materials can raise questions, as well as solve them.


Fig. 13. An assortment of finished book cloth. All of these had three layers of paste applied.

Another way around this strike through would be to back the cloth with tissue. Again, this is not historically accurate, but it makes the cloth much easier to handle. I do this when rebacking or when rebinding an actual book. If backed, XSL stained cloth is as easy to handle as any commercial product. There is a very entertaining description of backing cloth with tissue from Big Jump Press.


Fig. 13. On the left, an unfinished model of an 1830s three piece cloth case using XSL stained muslin. On the right, a model of an 1820s era adhered-board tightback cloth binding using XSL stained muslin.

CONCLUSION

Book conservators may find XSL pigmented muslin a useful addition to their treatment options when rebacking, recasing, board slotting, performing other types of board attachment, and while making historic models.

The main difficulty is achieving an even surface coloring, so if this is not critical to the success of the project, the technique is straightforward, cost effective, and relatively easy. I find the slight unevenness in coloring using this technique is sympathetic when matching an older cloth, or when recasing a book.

I plan to experiment with a coarser, more loosely woven cloth as well as using pigmented  paste, which may be a traditional method. I also intend to investigate using XSL pigments to stain leather. Three goals include:

  • Developing techniques to stain the leather evenly and without bronzing
  • Working on methods to easily achieve and reproduce specific colors
  • Preserving the functional aspects of leather, so that the stain does not leach excessively during covering, penetrates to a sufficient depth, and the leather flexes without cracking


ACKNOWLEDGEMENTS

Thanks to the Cathleen A. Baker Fellowship in Conservation, Shannon Zachary, and all of the staff at the University of Michigan Department of Preservation and Conservation Lab who supported my current research into early nineteenth century bookbinding. It is a luxury to have some time to escape from the pecuniary pressures of private practice and follow my interests.

Images from Zaehnsdorf’s “A Short History of Bookbinding”

Zaehnsdorf’s A Short History of Bookbinding, originally produced as promotional material, contains some nice images of his premises and details of several steps in binding. Even in these low-res google scans, interesting details can be observed: the headbander using an upside-down plough, the massive finishing press with wood top (replaceable, to protect the press from glue?) used for spine lining and finishing, the sewer working inside the frame, etc….

Notably, some of the steps are described as a generic action — “backing” — while some have the specific names for positions — “collater, cutter-out and coverer”. Small clues like this can help to understand the divisions of labor in Zaehnsdorf’s large nineteenth century bindery.


The folder also has a slitting knife to her right.
Interesting a man is doing this, usually I see women doing it. Maybe his great beard got him the job!
Look how long the lay cords are, both to save money on the sewing supports and an indication that only one book at a time was sewn.
Press pin still stuck in the press, indication of the speed of work? It also looks like it either does not go through a hole, or new holes had to be drilled? Usually the holes are drilled completely through at 90 degrees to each other.
Upside down plough. Likely worn out, since the brass holder on many English ploughs would get in the way even if the blade was removed. The women seem to be wearing different aprons, while the mens all look the same.
The rectangular guide rails are on the end of the cheeks of this finishing press, much like Tim Moore does for his modern lying presses. Love the massive cheeks. I want this press! And we know he is using hot animal protein glue, note the pot with a gas line hooked up.
I wonder if he is cutting on a tin, or cutting board. The knife has a handle. In shoemaking, the cutter-out (called the “clicker”) is one of the most skilled and highly paid positions, since they have to decide how to make best use of flaws in the skin. He does have primo bench position, right in front of a window.
I would guess they are covering on litho stones. The man in the foreground is using a sharply angled bone folder to turn in the leather in the cap area, and I suspect supporting the opposite end of the book with his stomach. Are there band nippers also on the stone?
A better view of the same press used earlier. It looks like three sides are covered with extra pieces of wood. I really, really need this press.


***

I also noticed that Zaehnsdorf’s The Art of Bookbinding is available as a 6 hour audio book.  It would be an interesting experiment to listen to his instruction, while following along. I doubt I will do this, but if you do, let me know how it works!

%d bloggers like this: