

OVERVIEW
I’ve been investigating ways to create a sympathetic replica of early nineteenth century book cloth using Kremer XSL pigments and unbleached muslin. This technique also involves suspension staining and resizing the cloth with starch paste. Uses for this cloth include rebacking, recasing, in-situ repairs of damaged bindings, board slotting, and the making of early nineteenth century historic models. Preliminary results are quite promising, though there are a few caveats. Future experiments will investigate XSL pigments for staining leather.
EARLY BOOK CLOTH
Publishers’ book cloth started in the 1820s. Originally it was undecorated, faded quickly, attracted dirt, and over time became brittle. The book structures it was used on were traditionally considered “temporary”, were cheap and insubstantial, and as a result many examples have been rebound. Most studies of nineteenth century bookbinding focus on attractive and visually interesting aspects of book cloth that begin in the 1840, such as gold stamping and cloth grain patterns. Until recently, these early cloths have been overlooked by historians. It is doubtful that three piece adhesive case binding (aka. the hardcover) would have become the dominate rigid board book structure without book cloth.
Many examples of early cloth, searchable by year, can be found at The Library Company of Philadelphia’s wonderful online database of nineteenth century cloth bindings. Another easy to use visual resource is The Publishers’ Binding Online, where you can browse by the decade. But the best thing is to get to the nearest library and examine some actual books. Images cannot substitute for this.
John Carter, in his classic essay, “Origins of Cloth Bindings” recounts the moment of the innovation: a conversation in the 1820s between Mr. Pickering (the publisher) and Mr. Sully (the binder), with Mr. Pickering expressing a desire to cover a boards binding with something a little “neater”, like a blue calico window curtain that was hanging in the room. Since this event was recalled and recorded first in the 1850s, some leeway should be ascribed as to the details of this encounter. But it’s a good read.
English use the term “calico” for a cloth that in America we call it “muslin”, though some claim calico has a lower thread count. Confusingly, in America “calico” can also refer to a floral printed muslin. Floral printed muslin is ocassionally found on early American imprints, though these are invariably an owner’s repair, not something issued by a publisher.
In any event, there is nothing currently commercially available that reproduces the look and feel of early book cloth. And many books from this time period have been insensitively rebound, are damaged, and are now quite valuable historically and monetarily. Like the 1833 first American edition of Frankenstein in “muslin backed boards” for $35,000.00. Once books reach this kind of value, collectors, dealers, and institutions become more interested in having them conserved. Good news indeed, for independent book conservators like myself!
WHY XSL PIGMENTS?
The original impetus for investigating Kremer XSL pigments arose from problems with existing methods of dying and staining cloth. I ran across an informative pdf from Kremer Pigments, which described using them as wood stains. If it worked for wood, I thought, maybe textiles and possibly even leather?
Then I found a series of excellent blog posts from an American Museum of Natural History Conservation project, called In Their True Colors. Conservators investigated Orasol and XSL pigments. For their project, which involved recoloring faded fur on taxidermy specimens, they chose Orasol. It dissolves in alcohol, which facilitated introducing as little moisture as possible, in order to airbrush the fur in-situ. But the consideration of XSL pigments in a conservation context piqued my interest.

I’ve had difficulty with the usual methods of dying cloth, and some require extensive set up and clean up. Fiber reactive dyes, such as Procion MX reactive dyes, can be difficult to control and mix, and as the name implies, they react with all nearby fibers. Consider yourself warned. Direct dyes, such as Ciba-Geigy direct dye Solophenyl are also difficult to control, requiring heat and pH monitoring to apply. Traditional leather dyes, like Feibings, are very fugitive and not used in modern conservation. Aniline leather dyes can also be quite fugitive. Currently it is impossible to import the common dye used in book conservation labs, Selladerm dyes into America from the Leather Conservation Center in England due to customs regulations. Thinned Golden airbrush paints can change the surface and feel of cloth to an unacceptable degree, though for later nineteenth century heavily sized and textured cloths this works quite well. Book restorer Vernon Wiering is doing some interesting graining of cloth — I would guess with acrylic? — but he doesn’t detail the techniques or materials in his blog posts. Watercolor, gouache, and raw pigments generally don’t penetrate well into fabric. What to do?

Kremer XSL pigments are a relatively new pigment treated with a dispersing agent so that they solubilize almost instantly in water. They also remain in suspension once mixed. The unidentified dispersing agent, which coats the pigment, is possibly the only conservation concern. Anecdotally, I have heard these pigments are used in color field painting conservation. The earliest citation concerning them on the web I’ve found is 2006. I emailed Kremer asking for information about their history and received no reply.
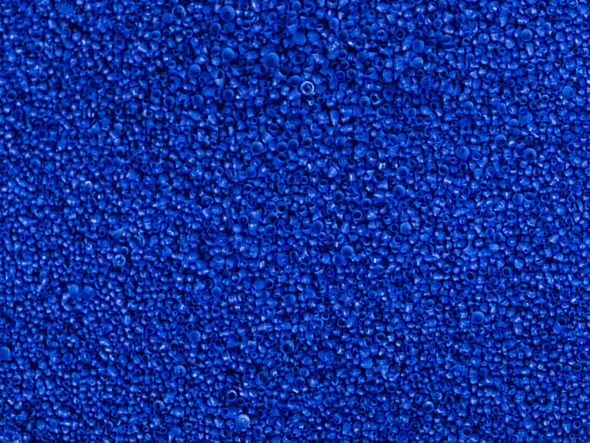
They are extremely lightfast, as seen in Fig. 3. They are relatively inexpensive with a complete set selling for about $90.00 from Kremer Pigments. Since they easily disperse in water, there are no solvent fumes to deal with. Because of their high tinctorial strength, a little bit goes a very long way. Clean up is easy since there is no binder.
I find it easier to mix a specific color with them, because I am more used of dealing with pigments and paint, rather than dyes.
MUSLIN
Since the earliest publishers’ cloth bindings were covered with a thin cotton, it made sense to start with modern muslin. It is sometimes called “airplane cotton” since it was used to cover wings on early planes, notably the 1903 Wright Flier. Unbleached muslin is available from a number of sources online, I ordered from Online Fabric Store, and it cost about $3.00 a yard. The coarsest thread weave I’ve found is 60 x 60. A better match for older cloths would be something coarser and more irregular weaving pattern.
Modern muslin contains sizing or other additives that can interfere with the staining. It is best to machine wash the cloth. Wrinkling and folds can also interfere with even staining, so I dry it on a sheet of plexiglass. This way the warp and weft can be aligned or intentionally misaligned to match an irregularly woven older cloth. If necessary, iron it after removing from the plexiglass to make sure it is as flat as possible before staining.

SUSPENSION STAINING
For the toning and drying I used a technique based on one from the polymath Elissa O’Loughlin, a retired Walters Art Museum paper conservator, owner of Wren Haven Tools, maker of brass triangles and remoistenable tissue, a pressure sensitive tape historian, a pocket knife aficionado, &c., &c. She uses suspension staining to airbrush pigments on Japanese tissue. I highly recommended this workshop.
In this case, the wedges are folded corrugated board with a small weight inside to keep them in place, as seen in Fig. 6. I suppose taller wedges would dry more quickly. The ends of the fabric are clamped between pieces of binders board using binder clips. I tried applying the pigments by brushing and by immersion: there wasn’t much difference between the two. At some point I will also try to using an airbrush to apply the pigments. I suspect the method of application is less important than having a clean substrate.

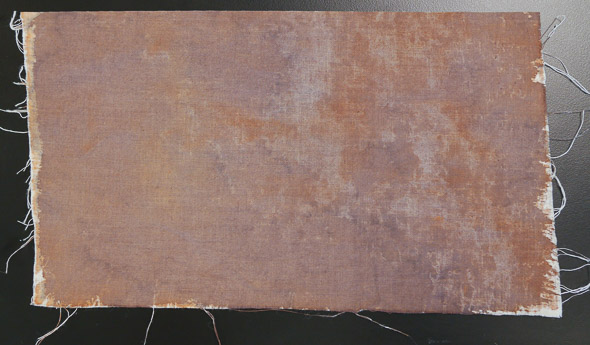
Drying the cloth flat on a piece of plexiglass can result in extremely uneven coloring, as seen in Fig. 7. I think this is because some of the pigments move more than others in the cloth while drying. Also, if there are folds or wrinkles pigments can collect unevenly in these areas. If the cloth is not adequately washed, additives can affect color absorption. Then again, some variation might be desirable if the intent is to simulate an older cloth.
Even with suspension staining, there is some unevenness in the final color, so if you need a dead even surface, use a different material or method of dying. If color matching is not critical, nineteen very evenly dyed colors of thin 100% cotton is available from Creation Baumann, though the weave is exceedingly fine.
Suspension staining facilitates an even application of the XSL pigment/water mix, since there is no pooling, and creases don’t develop when the muslin expands or shrinks. If the muslin expands slightly, the weight of the binders board and clips keeps the fabric moderately taut. Muslin shrinks back quite a bit when drying — which is why it was a good material for airplane wings — and the light weights let it move a little, while maintaining slight tension so it doesn’t pool. The color intensity is stronger with this method than with hang drying, as well as being more economical, since the color doesn’t drip off the end.
Ideally the weight of the binders board and binder clips should be matched to the wet strength of the suspended cloth or tissue, though maybe I’m overthinking this aspect. To suspend tissue a much lighter weight should be used. The top edge of the corrugated board wedge was covered with packing tape so the fabric could move and not wick away the pigment. Suspension staining allows the material to dry fairly quickly without additional handling, since both sides are exposed to air.

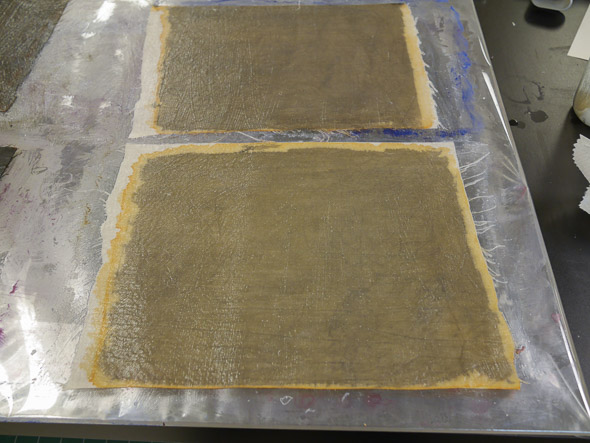
I haven’t rigorously tested all eleven XSL pigments, but some are more prone to move while drying than others. The Dioxazine Violet (#26410) as seen in Fig. 8 is especially volatile. Too thin a pigment/water solution also absorbs less evenly. Adequately washing the muslin in the beginning is the most important factor. There is less wrinkling and distortion if you wash the whole piece of cloth before cutting it into smaller pieces. Still, for reasons I can’t always explain at this point, occasionally the absorption is shockingly uneven, which is most irritating. Staining a much larger piece than you need would be smart, so you can cut the heart out of it. I haven’t been this smart, yet.
After the cloth is dry, I size it with wheat starch paste on a piece of plexiglass covered with some mylar to make clean-up easier. First, I put a thick layer on what is the back and adhere this to the plexiglass. Then I build up two or more thin layers on the front, letting it dry in between. Fewer layers makes a more natural surface, if this is what you want. Even more layers fill the space between the treads, eventually making the cloth look like a modern “linen finish” buckram.
It is easier to mix up a batch of fairly thin paste — somewhere between heavy cream and Greek yogurt — than thin down a thicker paste. Slightly warm paste penetrates into the cloth better. Too many many layers, or too thick paste, can cause the cloth to crack when folded, as seen in the middle of FIg. 10. If you don’t want this to happen to the hinge of your book, stay thin.

Somewhat surprisingly, the pigment didn’t seem to rub off much even before sealing with paste, unless it was colored with a very dark pigment. I even washed one sample after staining, and although the color became more dilute, but it didn’t wash out completely. The paste gives the cloth enough body when applied to a book. If the pigment does move when applying the paste, I suppose a few drops of Golden airbrush acrylic medium in the water/ pigment slurry would help seal it in place.
The weak bond between the XSL pigment and muslin can be easily removed by slightly dampening and/or lightly scraping the surface to achieve visual integration. Colored pencils or other pigments could also be used to achieve visual integration.

COVERING
Animal protein glue is traditionally used to adhere the cloth to the book or the boards. The cloth often stretches a little bit when gluing it to the boards or book, and this distortion is seen in historic examples, especially on the turnins where it is pulled tight. The muslin shrinks while drying it also molds itself to the board edges, making them look quite crisp. The combination of glue and paste make for a stronger bond than paste alone. Hide glue creates a wonderfully stiff feel to a book, even with thin boards.
One problem — which is also mentioned historically — is that the glue can strike through and leaves a permanent stain, as seen in FIg. 11. To prevent, or minimize this, the glue needs to be at the right temperature, and applied by stippling, so that it absorbs as evenly as possible into the fabric. The strike through is often more noticeable on lighter colors. It doesn’t happen all of the time. I still can’t predict it, which is frustrating.

I wonder why early nineteenth century bookbinding manuals always mention using glue. I should test more actual samples, but testing for starch is destructive, and it can be impossible to differentiate when the starch was applied; cloth, boards, or surface size. Since historic cloths were often a looser and coarser weave, any strike through must have been even more problematic. This needs more investigation.
One practical way around this problem is to use paste instead of glue. Although not historically accurate, if the paste does strike through, when it dries it will blend with the paste filled cloth. Paste is easier to use, and traditional when covering with leather and paper. Paste makes the muslin more stretchy and difficult to handle, which also could be a reason it wasn’t used. Glue seems to dry a bit quicker, but there are many variables in hygroscopy. But if a little paste squeezes out when covering, it doesn’t stain the surface. The XSL stain itself may be the culprit. This is a good example of how recreating a historic technique with modern materials can raise questions, as well as solve them.

Another way around this strike through would be to back the cloth with tissue. Again, this is not historically accurate, but it makes the cloth much easier to handle. I do this when rebacking or when rebinding an actual book. If backed, XSL stained cloth is as easy to handle as any commercial product. There is a very entertaining description of backing cloth with tissue from Big Jump Press.

CONCLUSION
Book conservators may find XSL pigmented muslin a useful addition to their treatment options when rebacking, recasing, board slotting, performing other types of board attachment, and while making historic models.
The main difficulty is achieving an even surface coloring, so if this is not critical to the success of the project, the technique is straightforward, cost effective, and relatively easy. I find the slight unevenness in coloring using this technique is sympathetic when matching an older cloth, or when recasing a book.
I plan to experiment with a coarser, more loosely woven cloth as well as using pigmented paste, which may be a traditional method. I also intend to investigate using XSL pigments to stain leather. Three goals include:
- Developing techniques to stain the leather evenly and without bronzing
- Working on methods to easily achieve and reproduce specific colors
- Preserving the functional aspects of leather, so that the stain does not leach excessively during covering, penetrates to a sufficient depth, and the leather flexes without cracking
ACKNOWLEDGEMENTS
Thanks to the Cathleen A. Baker Fellowship in Conservation, Shannon Zachary, and all of the staff at the University of Michigan Department of Preservation and Conservation Lab who supported my current research into early nineteenth century bookbinding. It is a luxury to have some time to escape from the pecuniary pressures of private practice and follow my interests.

Really interesting development in toning textiles, Jeff, and I am very keen to give these pigments a try – it looks like a great solution for specific applications, and it’s really clearly laid out in your post. I am very interested in the ease of application and the ability to tweak the finished shade, which I wholeheartedly agree reactive dyes don’t have. Suspension staining is a fantastic idea. I’d be very interested to hear more about the penetrability of the pigments, and whether the whole depth of the fibre is toned, again a significant consideration for use in book joints. Have you tried this toning method and material for slotting? Just a quick additional point about reactive dyes: one of the reasons for choosing them is their incredible wet fastness and low crocking potential, which perhaps other toning methods don’t have. Plus they are only reactive in the dye bath, and not the finished textile. Thanks for sharing this, really very useful – if you do try them on leather please do post your results.
Hi Victoria,
The depth of penetration depends on how soaked the cloth is, how thin the pigment water mixture is, and how tightly woven your cloth it. I couple of times I applied the pigment to both sides to fully coat it. Immersion might be a good choice, followed by suspension drying.
I haven’t used it for slotting yet, but when I do will put a little thin acrylic medium in it to insure no pigments leach. The medium should stiffen the cloth a bit more, and reduce solubility of the paste, making it easier to insert into the slot.
Still a lot to explore, so I will keep everyone posted.
Interesting subject and research, bookcloth is less studied that vellum and parchment but still very interesting.
The other time (the only one) I spotted something about bookcloth was less than a month ago, I followed in the last E&T Conference by Society of Bookbinders in Keele, UK, a lecture about bookcloth by Tony Mack
In his lecture he told bookcloth manufacturing with a little bit of history and gave a video demonstration on how to make a DIY coated bookcloth with his recipe. The title was : “Carry on Coating: a Glimpse into a Bookcloth Factory in the 1970s”
Thanks for the comment, I’d love to see any workshop handouts or the video if it is online somewhere.
In terms of history and industrial practice, Tomlinson’s book is the most comprehensive: Tomlinson, William and Richard Masters. Bookcloth: 1823-1980. Cheshire: Dorthy Tomlinson, 1996.
Hey Jeff-try “scouring” the cotton, the way you would if you were dying it. Put a small amount of washing soda or soda ash in a pot of simmering water- summer for 2 hours,rinse, dry. Lots of disgusting oil and weird smelling stuff comes out.
Yes, I’ve since tried even quick boil which helps a lot. More sounds even better! Thanks.
This is all very interesting. I have long considered taking up bookbinding as a hobby, but have always been a bit intimidated by the plethora of materials available and the apparently array of equipment and skills required. Perhaps someday, if and when I ever retire.
Well, you can always start with simple structures that require minimal equipment. It is a great hobby!
Most interesting post, Jeff! I agree with Clare re the scouring routine. Trad natural dyers swear by it. The dye uptake is markedly improved and one gets less patchiness, if any. Try using a really big pot with at least 16 cups of water plus a cup of soda ash – not that A&H washing soda you get in the supermarket which has other stuff in it. Keep the water bubbling, top up as needed, cover the pot…can you do that outside? It smells…(I was looking for info on paste papers when i came upon this most interesting distraction)
Thanks, as soon as I have a break from work I want to continue working on this!
Hi Jeff,
Interesting and detailed post! And well done on that cloth. It looks really good. Good to see other conservators replicating 19th Century cloth. I was just explaining to a visiting college class today the difference between the starch filled cloths of the 19th Century and the acrylic coated cloths of today, and how unsuitable the latter are for proper historical work sensitive to the 19th Century. I have also used muslin to recreate the earliest of binding cloths. I generally find that muslin cloth is a bit thick for the purpose but it’s better than the alternative. Also, from what I can tell is that much of that early cloth is actually linen and very thin, making the replication even more difficult. In any case, you mentioned me in the post, and now I am challenged to detail my process, so when I have some time and am at it again, I will do so. I have in my stock some New Old Stock book cloths, some of which are starch filled, and these are what I use to color and grain to fairly happy success. I’ve played with graining acrylic cloths but not with much success. When I run out of my stock of early starch filled cloths I’ll have to start innovating again. I’ll read your post in more detail next time I am set up for coloring. As far as the actual coloring goes, I use a mixture of flour paste, aniline dye, and sometimes watercolor or other pigment for stability.
Best,
Vernon Wiering
Thanks! and it really means something coming from you, since you have done some amazing cloths and 19th c. style bindings,
like:
http://wieringbooks.com/bindersticket/?tag=grained-cloth
Hi Jeff,
Wonderful to see this information.
I have also worked (played) with similar materials to meet the needs of various binding and book conservation projects.
Cloth: You mention some of the challenges with cloth. I learned from textile conservators about the various fabric treatments that are applied. They referred me to TESTFABRICS in Pennsylvania:
http://www.testfabrics.com/products.php?catID1=TWpBPQ==&catID2=1
Their fabrics are not treated like the retail store materials. TestFabrics also have a variety of weights of cloth to meet our needs.
While linen could be used, I chose cotton because of other recommendations from textile conservators — but that’s another story.
Dyes: I also tried dyes, but the resulting cloth was too uniform in color, whereas I wanted to see the variation, similar to the commercial “linen finish” bookcloth. At the same time, dyes had handling issues. Therefore, I used acrylic paints, where the pigment is already suspended and it mixed well with the sizing.
Sizing: While I also used wheat paste, I decided to add methylcellulose (A4M) to the mix — usually a 50/50 mix.
Procedure: The sizing mix was prepared and the acrylic paint was carefully added. The cloth was dampened to uniformly relax the fibers and then laid on a sheet of Mylar. The pigmented size was applied with a small paint roller to one surface and the cloth flipped to allow application to the reverse.
Results: While there were occasional variations, most of the cloth was a uniform color. The resulting dried cloth could also be burnished to the degree of smoothness. This cloth was used on many bindings, including some books with raised bands — the cloth molds wonderfully. For those books, the budget did not allow for covering in leather. The end result was quite satisfying — a short article is in the AIC-BPG Annual.
Keep up all the Great Work you do for conservation.
Thanks,
Bill Minter
Thanks Bill!