
Brian Rytel, who is starting an old tools wiki called Galootopedia and Tom Conroy, who likely knows more about plows than anyone on earth, have forwarded me some information about a plow Rytel picked up. It is intriguingly crude and I’m impressed with the amount of information they were able to glean from it. It is also pretty rare to find a plough in the wild.
The plow is likely the most important tool in the history of bookbinding since the use of it helps to define the boundary between “temporary” structures and more permanent ones.
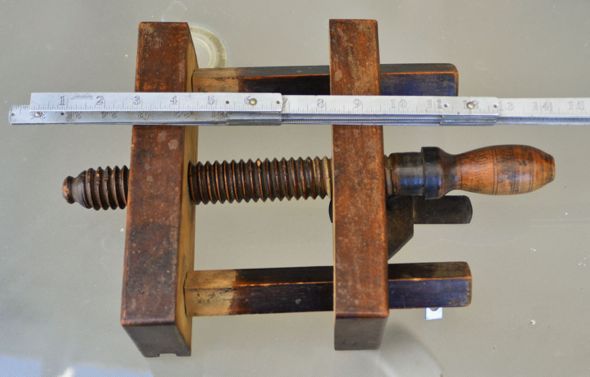
Rytel writes: “Meandering through one of our smaller but higher-end markets today, I found another plow. Some notable aspects: square rails angled 45 degrees to the sole, non-captive screw (and appears to never have been, though I am uncertain), and a hand made blade tensioner screw which is mounted through the top of the plate. All of the fittings are iron and have rusted quite badly but I believe I can get them apart and moving again. The rails and/or the screw aren’t quite aligned properly. The arms/rails are just screwed in, butted (poorly) against the cheek and have little stopping them from rotating on the screw other than the mortice in the other cheek. Once the bodger assembled everything he should have put a couple of brads alongside the screws to keep the arms from rotating. The two angle brackets must be recent additions and are ideally located if one was to use picture frame wire to hang the plough on a wall.”
Conroy responds: “It’s very interesting. Everything there looks perfectly good, though the amount of corrosion might be the killer as to usability and value. Looks to me like it is French or European, possibly older than the ones I have seen (the bit of decoration around the edges says “older” to me) or made by a non-binder to a binder’s orders copying a French press.

Fig. 2. Detail of the bottom of the French style blade holder (reversed) and angle brackets.
The blade holder is the standard French type, but turned around so that you can get your fingers on the thumbscrew without slicing yourself up. I think it has just been turned around by someone who took it apart and didn’t know the standard way. The standard French orientation with the thumbscrew between the cheeks of the receiver is stupid, its bad design, but that’s the way they are done. Turning around the receiver might be enough reason by itself for the registration of the blade to be off; also, there might have been paper shims between the wood and the receiver that were lost when the receiver was turned around.
I wonder if the screw hole in the receiver was originally metric or Whitworth or whatever? That might answer some questions. I find that the wooden screws are often ambiguous metric-or-inch, and presses that were beyond reasonable doubt made in one may still measure as if they were in the other. But the metal screw should be diagnostic, if any of the original threads are undamaged.

Fig. 3. Detail of slot in the moving cheek and finial of the screw.
The slot along the moving cheek would work over a runner bar on the press cheek. This is very typical of French ploughs, but not of English and American ploughs (which usually work between runner bars) or German-Dutch-Scandinavian (which might work against, not around, a single runner bar). There are also variants where the press is grooved for a bar on the plough. This one has then normal French set-up.
The cheeks are very low, which means that you can’t take off a big width of margin; also, you can’t replane the base of the plough many times before your knuckles start to drag on the press. On the other hand the bead around the base suggests that not much has been lost to abrasion yet. That might suggest a press in the hands of an amateur. On the other hand, the end finial of the big screw looks old and professionally made to me, 19th rather than 20th century.
The diagonally-set square guide bars are very interesting. I’ve never seen anything like them, in ploughs, presses, or in illustrations. Square guide bars are common enough, especially on older and European presses and ploughs, but the diagonal mounting is unique. On thinking about it, I can see how it might appear to have expansion-and-contraction and wedging advantages, but I think the advantage is specious. The square-section guide bars I have examined in sufficient detail were wedged with vertical slits, so that the wedging action pushed along the grain of the cheek, not horizontally which would mean across it with a splitting action.
Its very odd indeed for the guide bars to be sticking out on the side away from the wooden screw. Usually they are all three on one side, and the handle is on the other side. As set up it looks to me like the guide bars would get in the way of the right wrist. However, that does (as far as I can tell from the photos) to be the way it was done originally.
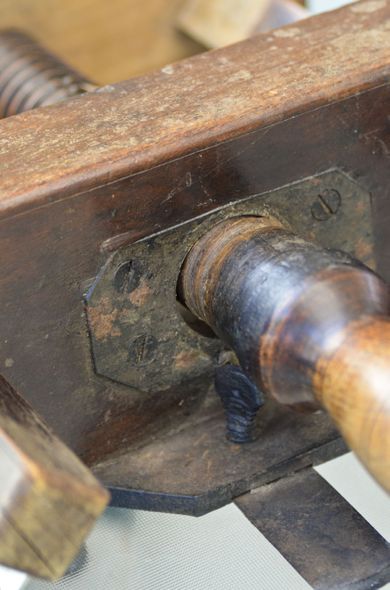
Fig. 4. Detail of screw attachment “girdle” on blade cheek.
It is surprising the big screw is apparently non-captive/collared. The steel plate the handle rests against looks to me like it was part of a “girdle” mechanism; a similar arrangement, but with wooden rather than iron girdles, is found on Italian presses. I don’t see a split in the iron plate, but it could be put on as a girdle if the handle and screw were made as two pieces and glued together around the girdle; this is an arrangement I have seen with wood girdles, though I don’t think it is a good one.
I have been trying to figure out what the new-looking angle brackets were for. They don’t even make sense for mounting it in a display. They certainly don’t make sense in any use of the plough that I can think of.”
Peachey adds: My only additional thoughts (just from looking at the images) are that the guide bars and blade holder and were turned around because something broke. The unstained areas of bars look like they could have been inserted into this or another cheek. This would also be in keeping with the blade holder being reversed to get a little more cutting room for the thickness of the books. Possibly a number of parts from different damaged plows. Could the lack of staining on the inside of the cheeks be an indication that an earlier thicker cheek was cut in two? I checked Dudin and Diderot, and the plows illustrated are non-captive. The fixed blade attachment they illustrate, however is more like an English and American 19th and 20th century plows.
A complete series of images are availiable at Brian’s personal blog zengrain. Check it out. Thanks Brian and Tom.


