Whatsit #1


Often when I find tools at flea markets, and I don’t know what they are for, I buy them.  This one was particularly puzzling because it is so similar to a typeholder.  It must be a typeholder for something, perhaps rubber faced wood type?

It is very well made, and the knob on the top adjusts for different font sizes.  The ferrule is very strong and longer than I usually see.  It seems made for standard, type high letters.  The beveled area in the picture at the right suggests it was sighted from there.  The adjustable guides are very thin, suggesting it was used with a hard type– either wood, metal or rubber tipped wood.  There are no marks on the end of the handle so it was just used with hand pressure. The style of the knobs and attachment look early 20th C. I think the handle is beech.  The only marking is a number “2” on the front right side. It is 128mm long and the main metal part is 82mm wide, and most of the steel parts 3mm thick.

Comments or thoughts, anyone?

Blinded By Aesthetics

Conservation involves creative thinking, but mainly in a problem solving sense; how to accomplish a clearly defined goal when dealing with a unique object.  Respecting the object, not self expression, is a guiding principal. Even with bookbinding type projects, which I sometimes do, they often involve working with a designer or art director.  I do have some input, but  more often am hired to realize a preexisting idea.

So I am an amateur woodworker to satisfy a creative urge.  Tools for working wood (link on the right hand side bar) sells the metal hardware and blade to make a turning saw.  They also supply free plans, all you need to do is supply the wood.  Did I follow the plans?  Of course not!  As I spent a sunday afternoon spokeshaving the three main pieces, I became more and more interested in emphasizing their thin curves, thinking how elegant looking they were becoming and not thinking about how much tension they would be under when I tightened the toggle.


Did I loosen the tension when I was storing the saw?  Of course not! I wanted to be able to grab it and use it.  I did use a natural hemp to twist the toggle, which I was hoping would counter act some of the changes in humidity and keep the tension even, however it is apparent there was simply too much tension for the extreme curve.  The wood was a clear quarter sawn white oak, that I air dried myself.  

About 2 months after I finished the saw, I picked it up to use it and noticed that the wood had split right along the grain.  Looking at it now, the weakness in the curved area seems obvious.  I didn’t give it a thought when I was involved in the act of spokeshaving.

Often, the most common mistake beginners in any craft make is to overbuild, and they end up with a clumsy, heavy, wasteful and amateur looking product.  I went the opposite direction.  Lesson learned. Time to make another one, this time a little straighter and thicker.  Will I follow the plans?  


Tool Holder


About three years ago, I got tired of never being able to find the basic tools that I used the most.  I kept them in a couple of cans at my workbench, and they ended up all over the place by the end of the day.  I decided to first analyze which tools I actually used the most, which turned out to be a tiny fraction of the tools I had, and devise some kind of storage so that I could easily reach and immediately put back when I was finished.  Although it took a bit of time to do this, I estimate it saves about 5-10 hours a year in time spent looking for tools, which is significant. I constructed this holder out of two pieces of eight quarter cherry. I also made a travel box for working on-site that has a similar system built in.

In case anyone is interested, below is a list of the tools that I use to accomplish about 90% of my normal tasks, and a few comments.  Not pictured are brushes and larger rulers.

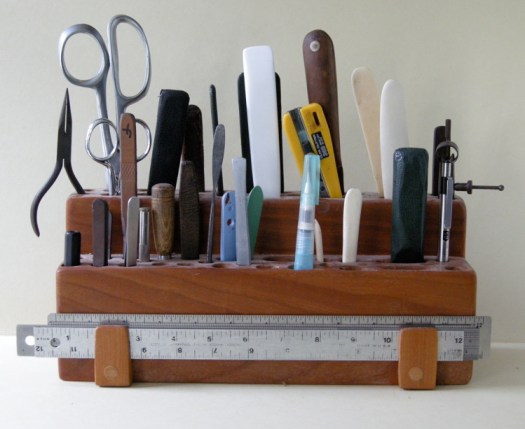
ON THE TOP ROW, LEFT TO RIGHT

-Needle nose pliers

-6″ Mundial embroidery scissors (small, yet the tips can cut through a double layer of aero linen)

-Osborne “E-Z Cut” scissors (these can cut through binders board)

-Medium lifting knife

-Covering knife

-Small lifting knife

-Large lifting knife

-Large teflon folder

-Olfa knife (the ones with a knob are less likely to pull out when cutting something thick)

-Bench Knife

-Two large bone folders

-Two small dividers (less than 4″, leatherworkers ones that operate by friction are easy to adjust)

ON THE BOTTOM ROW, LEFT TO RIGHT

-Starret pin vice (the octagonal plastic handle keeps it from rolling off the bench)

-Four Dumont & Fils tweezers, #2a, #10-00 and 2 #5’s  ( #5 is a sharp point, #2a a wide thin point for tissue, and #10-00 a convex / concave points for gripping)

-Insertion tool

-Small awl

-Japanese  awl

-Rigid scalpel (good for scraping)

-Italian microspatula

-Two plastic handle scalpels,  #11 and #15 blades (plastic is slightly flexible and more comfortable than steel)

-Rigid scalpel 

-Japanese brush pen, 50/50 ethyl alcohol and water

-Two small bones

-Hacksaw english style paring knife

-.5mm mechanical pencil

ON THE BOTTOM

-Four rulers (one thin cork backed for tearing tissue and trimming endsheets, two thicker steel often used as spacers and to tear tissue more ragged, 7/8″ wide aluminum which is turn-in thickness)

BEHIND THE STAND, mounted in a recessed area

-A brass 4 inch triangle