Twelve Ways of Testing Knife Sharpness

1. Visual inspection. When looking directly at the blade edge, with a light source behind you, are there any reflections? If so, these are dull, bent or chipped areas. The cutting edge should be an almost invisibly smooth black line.

2. Visual inspection, with magnification. When looking at the side of the blade, the smoother it is, the sharper it is, and presumably the longer the edge will last. Brent Beach, for example, measures wear in terms of pixels in a microscopic image at 200x. Leonard Lee’s Complete Guide to Sharpening has a number of electron microscope images of blade edges. Take heart, though, even a “sharp” edge will look like the Rocky Mountains if enlarged enough.

3. Shave a few hairs on your arm. If it is sharp enough to shave, it is probably pretty good. WARNING: THIS IS DANGEROUS

4. Rest the blade on a pen held at a 15 degree angle. If the blade, with just the weight of the knife catches the plastic, it is sharp. If it slides off, it is dull. The closer to parallel the pen and the knife are, the sharper the blade is.

5. Do this same test holding the blade and GENTLY and see if it catches on your fingernail.  WARNING: THIS IS DANGEROUS.

6. Tsujigiri. This test likely seems a myth. Supposedly, at one time, samurais tested their swords by the number of torsos they could cut through in one stroke. The sharpest one was a #5. WARNING: THIS IS DANGEROUS, IMMORAL AND ILLEGAL.

7. For kitchen knives, see if they can penetrate a tomato or onion, with no downward pressure and no sawing. There are many variables in the toughness of the skin of a tomato though, I imagine.

8. Longer blades can be tested by slicing paper, even toilet paper. There are many youtube videos of this. Slicing cardboard, because of its consistent and abrasive nature, is often a field test of edge durability.

9. Feel the edge ACROSS THE BLADE with your finger, applying virtually no pressure. The smoother it feels the sharper it is. You should be able to feel any slight irregularities, indicating  a dull area. WARNING: THIS IS DANGEROUS.

10. Test it on a difficult to cut substrate like styrofoam, cork, or balsa wood.

11. Send the knife to CATRA. They will qualitatively test for initial cutting performance, edge durability, and edge geometry. This will, however, dull your knife, so it is designed for production samples.

12. Possibly the best test is just to use it. Providing you are familiar with the material you are using it on, you can often tell instantly if it is sharp depending on how much force you have to apply.
NEW! For Sale: Sharpening System 3

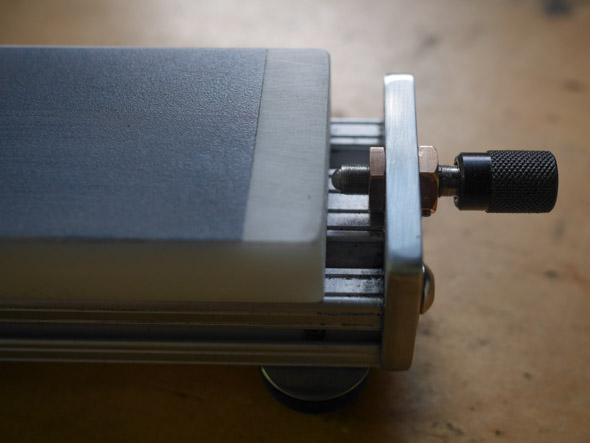
There are three major improvements to this Sharpening System: Delrin plates for easy removal of used finishing film, an upgraded tightening knob, and larger feet for added stability. I’ve tested this new system for over a year for all the knives I make. Verdict? Excellent, IMHO.

ss3-3
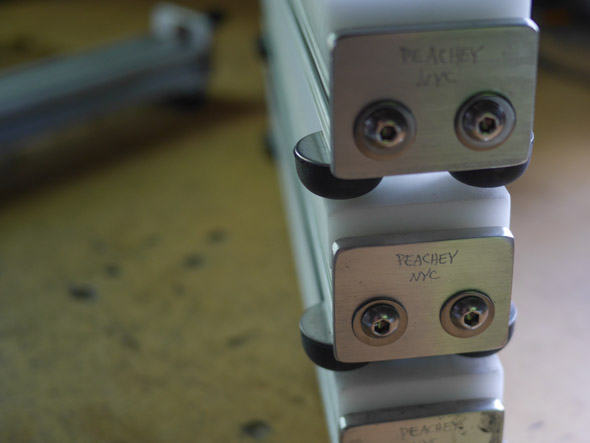
Sharpening System 3. End view with Delrin plates.

First, and most importantly, the support plates for the microfinishing film are now made of Delrin instead of aluminum.  This makes it possible to easily peel off the worn finishing film without using solvents or a fair amount of elbow grease. It stays flat, and doesn’t dish out. The microfinishing film stays in place when in use. The Delrin plates are first machined, then hand lapped. They are 12″ long, 2″ wide, and 3/4″ thick.


ss3-2
Sharpening System 3. Detail of the precision knob.

The second upgrade is to the adjustment knob.  Previously, it was simply tapped through the end of the stand, with a coarse thread.  The new adjustment knob is made from stainless steel, has a very fine pitch, threaded through a phosphor bronze bushing. There is virtually no backlash, and nothing to rust. The end of the threaded rod contains a rounded ball, which prevents torquing of the plate while tightening. I’ll be the first to confess that this optical grade adjuster is not absolutely necessary, but, man, it is nice! Like a manual focus Leica lens.

Precise and accurate tools help perform precise and accurate work. At least, his is how I rationalize expensive tools… .

Lastly, in order to make the stand a bit more stable, the hard rubber feet are now one inch wide, with a flatter profile, giving more anti-slip contact with your bench. They can also adjust a bit to level.

This Sharpening System is a quick and convenient way to sharpen,  resharpen and keep all your knives and edge tools in peak condition, from scalpels to scimitars, plane blades to plough blades. This is a lightweight, easy to store and unbreakable system. Perfect for travel and classroom use, since there are no expensive stones to dish out, glaze over, or break.

The 3M finishing film cuts all modern high tech steels quickly and evenly. Replacement 80 micron film is available from Rio Grande; the 40, 15 and 5 micron from Tools for Working Wood.


ss3-1

The system contains everything you need: a sharpening stand, two Delrin plates, four 11 x 2″ strips each of 80, 40, 15 and 5 micron 3M PSA micro finishing film, a 12 x 2″  Genuine Horsebutt Strop, and 1 oz. bar of green chromium oxide honing compound.

SHARPENING SYSTEM 3:  $285.00      Order here

Neolithic Knife Sharpening Stone?

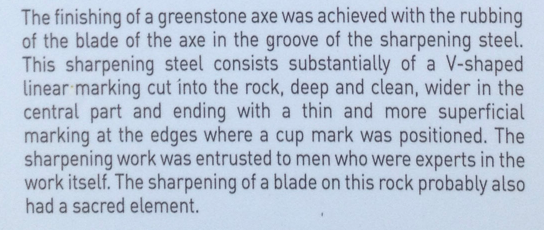
On a recent trip to Italy, I was hiking around the  Geoparco Del Beigua in Liguria. It contains what is identified as a Neolithic stone for resharpening greenstone axes, among other carved stones. Actually, the entire site consists of reproduction stones, the originals removed for protection. In case you have forgotten (as I did), the Neolithic period is the end of the stone age, generally defined between 4,500- 2,000 BCE. This is right before the copper or bronze age begins.

Screen Shot 2016-06-18 at 6.11.28 PM
Explanatory text at the entrance to the site. Geoparco Del Beigua, Liguria, Italy, 2016.

Stones like this are not unique to Italy, they are found all over Europe, and are simply called “grooves” or polissoirs by archeologists. These stones were first identified as sharpening stones in the mid-19th century, though now this is debated. Some archaeologists believe they are a type of calendar or perform another symbolic function.

The explanatory text struck me as largely conjecture. The comment that sharpening was entrusted to experts is doubtful to me, as well as the idea of a sacred element in sharpening. Such a large stone, out in the open, would suggest a more communal activity, rather than ritual expert use. I’d bet that resharpening, especially stone axes, was a common enough occurrence that anyone using one would have to perform maintenance on the edge. There are many small sharpening stones from the Roman era that have a small hole drilled into them, so they can be carried with the user.

sharpening
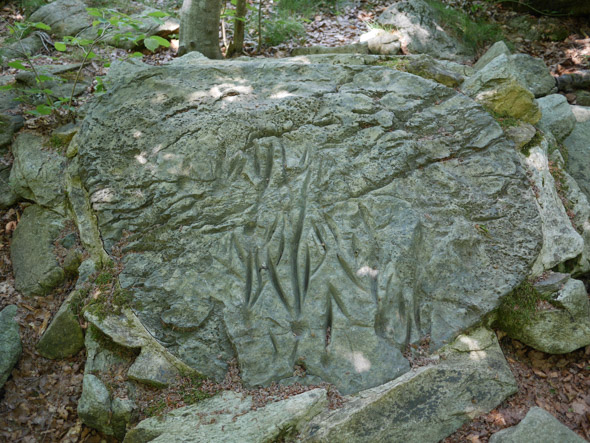
Neolithic Sharpening Stone. Reproduction. Geoparco Del Beigua, Liguria, Italy, 2016.
sharpening2
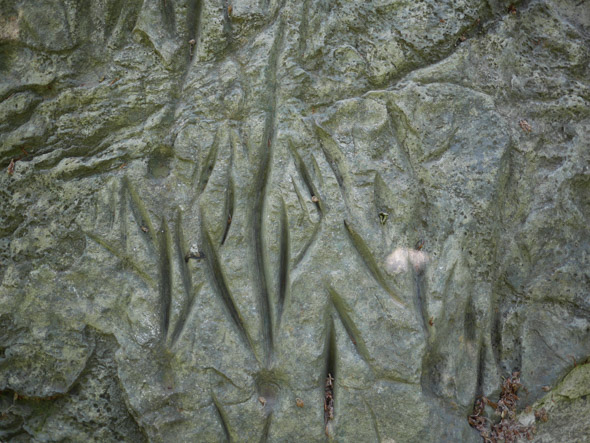
Neolithic Sharpening Stone. Reproduction. Detail. Geoparco Del Beigua, Liguria, Italy. 2016.

More troubling, is that these grooves don’t reflect the way a stone would wear down during the course of sharpening. If the axe was used in these grooves, it would dull the cutting edge.  Only by twisting the axe (which could account for in the curves of the marks) would it be sharpened.

Another problem is that these grooves would have had to be defined by some other tool before the sharpening began.  A relatively flat area of the stone would be much easier to find and use, it seems, which is the most common shape for sharpening stones. So the idea that these were a type of jig for sharpening — which would also negate some of the need for an expert to perform the sharpening — seems suspect. This was no ancient version of a Chef’s Choice  knife sharpener, which sharpens both sides of the knife at the same time.

These questions aside, what blows my mind is that natural stones are still used by many to sharpen knives. Are sharpening stones the only stone age technology still in common use in the 21st century?