Dan Smith wrote this review for the Guild of Book Workers Newsletter, April 2015, No. 219. If you are not a member of the Guild, you are missing out on a lot of other things: workshops all over the US by professional bookbinders, a bi-monthly newsletter, an infrequent journal, a secret handshake, and a yearly conference.
Having an Edge: A One Day Workshop with Jeff Peachey
Review by Daniel Smith
I often wondered why such an important component of bookbinding—sharpening, seems so overlooked in workshops and general instruction. Dull knives can be the source of great frustration. Jeff Peachey has spent much of his career fixing this situation. He ran a one day workshop recently at The Conservation Center on the Upper East Side of Manhattan demonstrating his technique. Here’s what I learned.
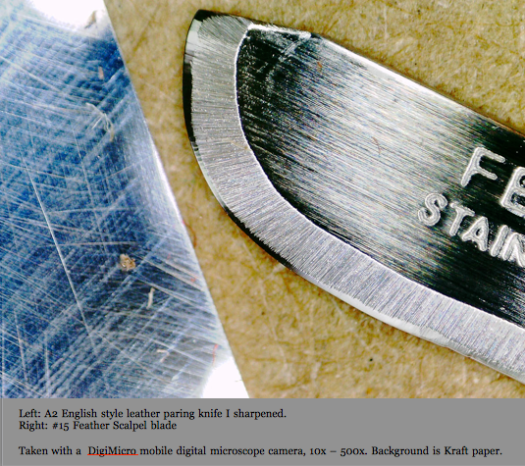
We were given a choice of right or left hand English paring or Swiss knife blanks to work on. All had been machine ground to the correct bevel of 13 degrees and our assignment was to sharpen and hone the blade.
Thou shall not round the bevel.*
If uneven pressure is applied while sharpening, the bevel can develop an obtuse roundness that requires a regrinding to remove. This is the most common mistake. This problem can be avoided by placing the knife bevel side down on the film and pushing down on the edge and allowing it to lock into the proper angle. This is something you need to get the feel for.
Thou shall sharpen side to side.*
The idea is to use increasingly finer grades of abrasive film (3M Microfinishing film) to achieve the finest edge. The strips of film are mounted on Delrin, a plastic with hardness and rigidity like steel. The film is backed with a pressure sensetive adhesive that allows it to be reused. The first grade was 80 micron. This was used until all the deeper gouges from the machine cut are removed. This stage is the easiest to see the difference between the old surface and the new. It also takes the longest. Four fingers hold down the blade edge as you pull it side to side across the film using plenty of water as a lubricate. The water darkens with the tiny particles of steel that are removed from the knife called swarth. This is the aluminum plate sharpening system found on Jeff’s web site.
Thou shall not advance to the next grit until the burr develops.*
Once you’re done with the bevel side you need to grind the flat side to remove the burr that has built up. Feeling the burr is a good way to tell how evenly you’re grinding. If there’s less burr on one side more pressure must be applied while grinding. Jeff recommends using grits half the size of the previous one, so from 80 micron we went to 40, then to 15 and to 5. It was increasingly harder to see what you’re accomplishing with the finer grits but by [feeling the burr and] careful inspection we made progress. I found the concept of creating a knife edge so sharp that it would easily pare leather a bit intimidating so I thought of the process more like polishing than sharpening.
Another aspect I found intimidating about sharpening a knife was wondering if I would have the patience to finish what I suspected might be a long and tedious process. This was not a factor at all. Granted this was a motivated group comprised of conservation students, bookbinders and one guitar maker, [but] Jeff’s enthusiasm and knowledge empowered us and made us eager for all things that could cut. I know a few of us felt that we were finally being let in on a great secret and that we would soon be able to exert some control over the drawer full of dull knifes in our studios. What kept me going was knowing that the final result would be a knife I could trust.
Thou shall not covet, or borrow, thy neighbor’s knife.*
Mr Peachey shared with us many of his old tools, relics from the industrial age, that’s he’s collected from flea markets over the years. Knifes made from ground down files, an instrument for carving your name in logs, a bee-keepers knife, handmade chisels, knifes for picking bananas or shaping the heel of a shoe or cutting wallpaper or rope. He explained its original function and shape and showed how the years of use by a long forgotten craftsmen has resulted in its current form. He also brought his collection of vintage double edge razor blades as well as ingenious devices used for sharpening them,
We were encouraged to bring our own knifes and sharpening equipment for evaluation and it was a mixture of relief and disappoint to learn that some of the items were useless for the purpose they were intended. Disappointment in that the item was a waste of money and time but relief to know it was the tool and not the hand. Some learned their favored items could be salvaged and were worthy of the effort.
Jeff went through the process with us with a knife of his own, showing us what to look for and demonstrating the proper way to hold the blade. evaluating the progress with comments like “Now I could sell this knife.” We were well into the work when Jeff finished his and demonstrated the cutting ability. The moment we had been waiting for. Gasps went out as his knife pared the leather perfectly, and well, there’s no other word for it, like butter. We returned to our work with renewed determination.
Stropping the blade is the last step of the process. This is the familiar motion barbers use on a single edge razor before shaving a customer. Our strop was horse butt leather coated with .5 micron chromium oxide on the flesh side. This is a different motion than the side to side sharpening action. The knife is held perpendicular and pulled away from the substrate. Properly sharpened knifes can be stropped to produce a very sharp final edge. Double edge razor blades can be stropped to restore its sharpness.
My knife is now a prized possession, cuts leather beautifully and nice to look at. A bit of stropping brings the cutting edge right back into form. Final lesson: It’s a major faux pas to borrow a colleague’s paring knife, so don’t ask.
* from Peachey’s Ten Commandments of Sharpening
The Guild of Book Workers Website


