
At first glance, leather paring seems quite straightforward. You take a sharp knife, move it along the leather in a series of cuts, and gradually reduce the thickness. What’s so difficult about this? If you are using a spokeshave, just push it over leather to gradually reduce the thickness. Done. A razor blade paring machine? You don’t have even have to know how to sharpen the blade, just pop in a new one, and simply pull the leather through. Yet, like many craft activities, what is simple conceptually can take some time — often a frustratingly long time — for your hands to learn what your head knows.
There are three common methods of paring leather: a paring knife, a modified spokeshave, and a double edge razor blade paring machine. Most binders use a combination of these depending on the task. All have advantages and disadvantages. All have a learning curve. All are useful arrows in a bookbinder’s quiver.
CONTENTS
I. AN OVERVIEW OF LEATHER PARING KNIVES, TOOLS, AND MACHINES
II. HOW TO EDGE PARE WITH AN ENGLISH STYLE KNIFE
III. DETAILS OF ENGLISH KNIFE TECHNIQUE
IV. SURFACES FOR PARING
V. AN EXHORTATION
I. AN OVERVIEW OF LEATHER PARING KNIVES, TOOLS, AND MACHINES. WITH CONSIDERATIONS OF THEIR ADVANTAGES AND DISADVANTAGES
Many bookbinders, when getting into leather binding, are surprised by the wide variety of leather paring knives and machines. In bookbinding terminology there are four basic styles of knives and they are named for the nations that generally use them: English, French, German and Swiss. Other leather crafts use different terminologies for similarly shaped knifes, and leather workers often refer to “paring” as “skiving”.
In addition to paring knives, many binders use paring tools and machines. Most commonly a modified 151 style spokeshave, a double edge razor blade paring machine, or more rarely a razor blade plane. If you have a lot of work, skins can be sent out to be split, often by an a band saw type machine. A few also thin leather by sanding or grinding. Below are my observations on the advantages and disadvantages of all of these.
A. ENGLISH STYLE KNIVES
In North America, most binders use an English Style knife for edge paring, often oriented around 45 degrees to its length, followed by a spokeshave for making a long, gradual bevels. This type of beveling is used for English style fine bindings and rebacking. The knife making firm G. Barnsley made the most common knives used by English bookbinders in the 20th century.
ADVANAGES
- Comparatively easy to sharpen
- Easiest to learn to use
- Best for edge paring
- Modern tip style paring technique is easier to learn and control than a traditional heel technique
DISADVANTAGES
- Can only be used for edge paring
- You will need a different style knife, a spokeshave, or a razor blade paring machine to thin larger areas

B. FRENCH OR SWISS STYLE KNIVES
French style knives are very popular with fine binders, many of whom were French trained. Both French and Swiss style knives have a round cutting edge, and the Swiss knife is usually a piece of steel without a handle One defining stylistic feature is a center mounted wood handle, however. The handle on the French knives has always puzzled me, since you tend to hold it more on the blade and rest your palm on the handle. The handle protrudes onto the leather, limiting the angle the knife can be held. To get lower paring angle, I was the first to introduce the top mounted wood handle.
ADVANTAGES
- One knife can do it all, though some binders use this in conjunction with an English style knife
- Can be used with a scraping motion for thinning anywhere in a skin, useful for headcap or spine areas
- Round blades seem to stay sharp longer, since there is at least some area that is still sharp enough to get a “bite” into the leather
DISADVANTAGES
- Much more difficult to resharpen
- More difficult to learn to use
- More difficult to control
- Scraping with a knife is more dangerous than spokeshaving or using a razor blade paring machine
C. GERMAN STYLE KNIVES
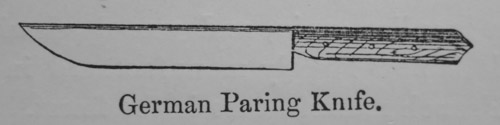
I’ve only used these a couple of times, so don’t really have an opinion. I did have a German trained student who used it expertly. The one I have is slightly flexible. In Zaehnsdorf’s 1890 The Art of Bookbinding, the German paring knife looks like a regular chef’s knife. Even the modern versions have a wedge shaped taper, so that the back is fairly thick and the opposite edge is sharp. Did the modern German style knife morph from a regular chef’s knife?

D. MODIFIED 151 SPOKESHAVE
A modified 151 style spokeshave is a powerful and effective tool for making long, gradual bevels in leather; ideal for rebacking or an English style full leather binding. It can also be used to bevel binders board. It is a lot of fun to use. These were originally intended for woodworkers, and I think binders started to modify these for leather starting in the 1920’s. Here is some of my research, and a tentative type study of 151 style spokeshaves.
ADVANTAGES
- Much faster than a French knife for reducing leather thickness over a large area
- Less chance of tearing through leather, especially with a shaving collector
- A must for calf, which tears or gets marked in a razor blade paring machine
- Can also be used to bevel board creating much less dust than sanding
DISADVANTAGES
- Difficult to modify a regular 151 style spokeshave
- There is a bit of a learning curve to learn to use them
- The leather must be clamped to the stone or glass, or the leather can be traditionally held with your stomach
- Cumbersome to use with leather smaller than 6 inches or so in one direction, to allow for room for clamps and motion of the spokeshave
E. RAZOR BLADE PARING MACHINES: SCHARFFIX, KNOCK OFF SCHARFFIX, BROCKMAN, AND THE FELSTED SKIVER
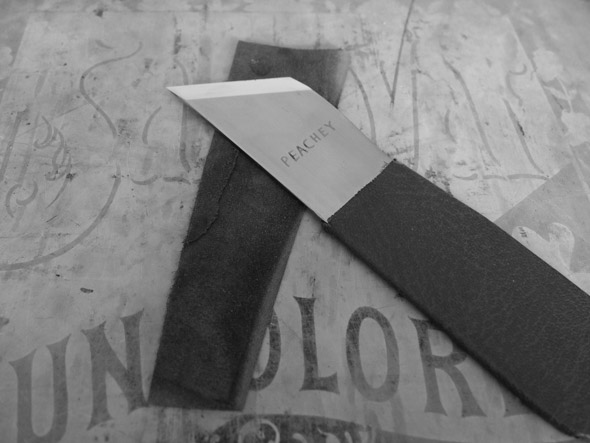
Razor blade paring machines, including the Scharffix, Brockman and the new “Felsted Skiver” all use a very similar arrangement: a double edge razor blade suspended above an anvil or roller. These are very useful for thinning small or large areas flat. Razor blade machines excel at paring leather very thin. Common bookbinding applications include millimeter bindings, spines and corners for half bindings, and most commonly leather labels. A spokeshave is sometimes used to clean up ridges created from overlapping cuts on larger pieces.
My favorite paring machine is the original style Brockman, which is not available new anymore. One advantage of his design is a curved bed for for the razor blade, which gives it significant rigidity and positions it to cut into the the leather straight on, rather than at an angle. Older hand held double edge razor blade handles also bend the blade like this. Brockman told me he made the first 100 of them himself, which are painted blue, and the later black ones were manufactured for him. A third green cast version was briefly produced in the 2000s (?), which looked very nice, but I haven’t tried it.
There are rigidity problems with many Scharffix machines, so make sure to test them out before purchase. There are also extremely cheap knock-off versions of the Scharffix machines for around $50 or less on you know where. I bought one, thinking how bad could it be? After wasting three days trying unsuccessfully to get it to function I had my answer.
The Felsted Skiver is the newest machine. Malcolm Raggett designed and is selling these. He has tested a variety of commercially available double edge razor blades, which is very useful research, and confirmed the Feather as one of the best blades. I tried one for a short period of time and it worked quite well, much like an old Brockman.
ADVANTAGES
- Short learning curve
- The best for paring very thin, flat areas of leather, like labels or half-leather bindings
DISADVANTAGES
- Difficult to create bevels (at least for me)
- Almost impossible to use on vegetable tanned calfskin
- Blades wear out quickly and need to be replaced
- Some of the machines can be tempermental
- Changing the blade can alter the cutting depth
F. RAZOR BLADE PLANES
I wrote a brief history of them, then added some tips on their use, and later recorded my failed attempt to make a better version. I ended up tearing a lot of leather, and went back to using a 151 modified spokeshave and razor blade paring machine. One quality skin can be more expensive as any of these tools.
G. INDUSTRIAL SPLITTING
This used to be common for french design binders, who even indicated what thickness the leather should be at various areas, through use of a template. I’ve heard these specialists are disappearing, though. We do have leather manufactures who will split a skin (or more likely a dozen) down to a certain thickness. This is an excellent option if you are an edition binder. If the skin is thick enough you can get both sides back. The machine that does this is like a toothless horozontal bandsaw. I’ve used Hohenforst Splitting Company and they did an excellent job on a difficult leather; undyed and unfinished calfskin.
H. SANDING OR GRINDING
I wouldn’t recommend either of these methods unless there are extraordinary circumstances. Not only do these methods produce a lot of hazardous dust, they are very slow and, at least in my experience, grinding is very uncontrollable. I have done this if the leather is exceptionally weak, or need to level chatter that has resulted from an improperly tuned spokeshave. In this case choose a very coarse sandpaper, around 80 US grit. Sanding an entire piece of leather for rebacking or covering is very tedious.
II. HOW TO EDGE PARE WITH AN ENGLISH STYLE KNIFE
“One of the most admired skills in bookbinding is the paring of leather, yet only sharp tools and confidence are required. Confidence is gained by experience, and sharp tools by a zealous consideration and care for knives.” Arthur Johnson, The Thames and Hudson Manuel of Bookbinding, p. 89
• As Johnson reminds us, make sure your knife is sharp. Strop it evenly on both sides to make absolutely sure. Then strop it again!
• Board your leather. This breaks down stiffness and reduces hard areas in the leather that can catch your knife, and cause it to veer unexpectedly. Boarding means folding your leather onto itself on your paring surface — flesh side to flesh side — and roll it over itself with your palms in four directions: top to bottom, side to side, corner to corner, and the other corner to corner.
• Place the blade angle of the knife at roughly 45 degrees to the edge you are paring. See the image below for the difference between blade and bevel angles.
• Cut into the leather place the tip of the knife so it is just shy of the paring surface. It should cut at an angle through the leather, coming in from the edge about a quarter of an inch.
• Place the length of the knife at low angle, relative to the paring surface. You may need to place your hand off the edge of the paring surface to achieve this.
• Use the fingers holding the knife as a jig to hold this angle
• Use your left hand to push the knife across the leather, taking off one long continuous strip. If you knife holding hand is strong, and your blade sharp, you will eventually be able to do this without the aid of your left hand.
• When the strip is made, go back the beginning and repeat the process form the beginning, but hold the knife at a lower angle, taking off
• The most you can edge pare with an English knife is about an inch into the thickness of the skin. If you need a more gradual bevel on the leather, use a round knife with a scraping action, an M2 hybrid knife, or a modified 151 spokeshave.
III. DETAILS OF ENGLISH KNIFE TECHNIQUE
To flesh out the above, it is critical to pay attention to the blade angle of the knife, since it affects how the knife cuts, and the angle one holds the knife at, and consequently how the leather is cut. I’ve found that roughly a 40-50 degree angle works best for tip edge paring. First, a few terms defined. The blade angle is from an imaginary line 90 degrees to the length of the blade. I am calling a zero degree angle one that would be straight across where the dotted line is, pictured below would be roughly a 45 degree blade angle. The bevel angle is the amount of slope on the bevel, in the case of leather paring knives usually around 13 degrees. The diagram below is the style of knife a right handed binder would normally use. (1)

I’ve found there are two main issues that determine the optimal angle of the blade; how much the blade is skewed in use and how the knife is held. The way I hold and use an English paring style knife is outlined below, as are the reasons why I consider a 40-50 degree blade angle ideal.
Skewing the blade in use reduces the effective cutting angle, improving the initial cutting performance and not altering edge retention. Although the more acute the bevel angle in effect creates a sharper the blade, if it is too severe the cutting edge will be very fragile and quickly deteriorate. It is also difficult to sharpen, since the thin tip deflects. I haven’t figured out the math, but if the bevel angle is 13 degrees, I estimate an extreme skew reduces the effective cutting angle by half?

DIFFERENT WAYS OF USING AN ENGLISH PARING KNIFE
Although I outlined the a basic method of using an English knife above, I actually hold it in three ways when I am edge paring: first to make a series of cuts using moderate skew, then a few finishing cuts using extreme skew, and finally use the knife with no skew. This final way performs like a spokeshave and smooths everything out. It doesn’t seem to make too much difference if you pare across the skin, as pictured above, or push the knife away from you, which is the traditional heel paring.
THE FIRST CUT
To make a long, even bevel the angle of the knife held steady by my thumb and second finger on the other side of the the knife– they slide along the surface of the paring surface. In order to pare the leather evenly, the knife must be held at a consistent angle. (2) The angle the knife is held varies with the type of leather and skill of the binder- too high of an angle takes off virtually no leather, makes it more likely to slice through the flesh side of the skin and dulls the knife tip by digging into the paring surface. Too low an angle makes the knife difficult to control, since most of the cutting edge is engaged into the leather. Wide knives with long bevels exaggerate this problem. Right handed beginning parers may want to use the forefinger of left hand to push the knife along the leather. This allows one to concentrate on using the right hand to hold the knife at a consistent angle, as illustrated below.

After a first cut is made, a second (and possibly third or fourth, depending on how long of a bevel is desired) is made by holding the knife at progressively lower angles. The depth of the cut can be judged by changes in the color of the leather or folding the leather in half, which doubles any errors. If the leather is disturbed to check the progress, it is imperative that any stray bits be cleaned from under the skin, otherwise the knife will cut through these thicker layers.
THE SECOND CUT
As the leather becomes thinner, it becomes weaker, so I adopt the second knife position. I skew the knife towards a more extreme angle and press down harder, which creates a lower effective bevel angle. This helps prevent tearing the leather. It is much easier to take the leather off in long even strips with the first cuts, rather than try to correct mistakes later on. If there are many irregularities, sometimes it is easier to use a spokeshave to even things out. Note the fingers on my right hand used as a jig, to hold the knife at a consistent angle relative to the surface of the leather.

THE THIRD CUT
After the edge is pared to the length and thinness desired, I rotate the knife into the third position, so that it is not skewed, and push it forward to even the previous cuts out. This is almost more of a scraping action than a paring cut, and is meant to smooth out irregularities left from the previous cuts, not remove a lot of skin. The angle of the camera in the illustration seems to exaggerate angle that the knife is being held- in reality it is almost parallel to the skin. Again, a spokeshave could do this as well. The cutting edge of this knife is one inch, which is slightly larger than most turnins. Most of the time 7/8″ is a reasonable turn in width–compromising between giving a little extra room in case the leather is torn, and conserving leather. One unintentional consequence of the acidic nature of some leathers is that they rapidly stain the pastedown, making it possible to observe in detail the pattern of trimming and size of turnins. I admire the judgement (and frugality!) of some binders, capable of covering the book so economically that only a millimeter of two of leather extends under the pastedown in various places.

OTHER BLADE ANGLES
A roughly 45 degree angle seems to be the most comfortable in all three of the ways I hold the knife. I have a set of knives that I use when teaching which consist of 22.5, 45, and 67.5 degrees, in order to compare what is most comfortable for each individual, and most opt for a roughly 45 degree angle. Another consideration is the angle of the wrist when using the knife– I’ve found around 40-50 to be most comfortable. Keeping the angle of your wrist comfortable is important if you do a lot of production work, to avoid carpel tunnel syndrome. Any numbness or tingling sensation is possibly a very serious problem, and medical attention should be sought. Choosing a good quality knife, keeping it well stropped and sharp will also reduce the force needed to pare leather, reducing strain on the hand and wrist. Finally, a 45 degree blade angle is much easier to sharpen than a 67.5 degree angle for two reasons– it is easier to get even pressure across the entire width of the bevel (especially the tip), and there is less metal to remove, so the sharpening is more rapid. Paring leather is not difficult, as Johnson pointed out, it just takes some practice with a sharp knife, and an awareness of the blade angle.
***
NOTES
1. As a left handed binder pointed out to me, simply changing the direction of paring allows a right hander to use a left handed knife, or vice versa. Below I am comfortably using a left handed knife, holding the leather at the top and paring towards myself.

2. Some find it more comfortable to hold a knife with a handle. In this case, it is sometimes necessary to hold the handle area of the knife off the paring surface in order to achieve a low angle. This illustration also demonstrates side to side paring.

IV. SURFACES FOR PARING
I really don’t think it makes much difference, as long as it is smooth and reasonably hard enough. Keeping it clean and free of debris is probably more important than what material it is made from. Any small stray bit of leather can get trapped under the piece you are paring, and the additional thickness cause you to create a hole in your skin. Litho stones, glass, glazed porcelain tiles, 12 x 12 pieces of marble are all used successfully by binders I know. If you are cutting into your paring surface and damaging you knife, the problem is your technique, not the softness or hardness of the surface you are paring on.
I photograph many of my knives on litho stones, but not for functional paring considerations; rather it looks traditional, the stones are non-reflective, and also roughly 18% grey. In other words, perfect for photography. 18th century paring surfaces seem to generally be marble, I suspect the only reason litho stones became popular was that they were a cheap plentiful source of a flat surface in the late 19th. Save the litho stones for the printers or bookbinding photography.

Charles Tomas Jacobi The Printers’ Handbook of Trade Recipes, Hints & Suggestions (London: Chiswick Press, 1891), 265.
V. AN EXHORTATION
Most introductory bookbinding manuals contain a section on leather paring. This can help learning different ways of holding the knife, and understanding the basic concept of gradual thinning. Videos (and there are lots of them) can also help; when it is well done it looks so easy! More information is better than less information. But really, boils down to getting a feel for it, or “embodied procedural knowledge” if you want to use a fancy term.
Finding someone to give you some feedback on your technique in a class or workshop can really speed up the learning curve, save a lot of time, and reduce wasted leather. Chances are if you are really struggling, something is wrong that can be fixed. Often it is your knife is not sharp enough. Sometimes just moving the knife a few degrees this way or that way can be the difference between success or failure.
But the best way to get better at paring is the most obvious: practice, practice, practice. So quit reading and make some shavings!
NOTE: the above is a compilation of revised blog posts I’ve written over the past dozen years concerning leather paring.

Wonderfully informative. Thank you, Jeff
Thanks!
I have been binding in leather for obout 40years, I mainly use an English paring knife and a French one. Calf I find a doddle, but my goatskins are quite old and now and again I have great difficulty paring them, the knife just won’t slide through the leather without using great force. I have tried changing the cutting angle, using a spokeshave etc etc. Any tips on paring tough leather, please.
Do you know what type of steel your English knife is? I find the newer alloys, like A2 and M2, stay sharp longer with tough to pare skins, even some with chrome in them. Have you tried lowering the bevel angle of your knife?